


This chapter is mainly explained the data integrity review and management. This will be useful for data analytics team to ensure the data integrity to eliminate missing data or data anomaly to ensure the data is available and accurate for data analytics purposes. User also able to import or export the data for other usage.
3.1 Data Integrity Check
A data integrity check ensures that the data collected from devices is both available and accurate for intended business use cases. This section outlines common symptoms that may affect data integrity, along with the procedures to identify and validate any data inaccuracies that need to be addressed.
3.1.1 Data Concerns
3.1.1.1 Missing Footfall Data
| Descriptions | |
| Symptoms | No footfall in and/or out data is observed during the store opening hours for the entire day(s) or selected hour(s) |
| Pre-Requisites |
|
| Checking Procedures |
|
3.1.1.2 Missing Wi-Fi Counting Data
| Descriptions | |
| Symptoms |
No Wi-Fi counting data is observed for the entire day(s), which includes
|
| Pre-Requisites |
|
| Checking Procedures |
If the Pre-requisites have been fulfilled and yet the issue persists, raise a support ticket under "Data Accuracy Concerns" category to FootfallCam |
3.1.1.3 Suspected the Device is not Counting Accurately
| Descriptions | |
| Symptoms |
Site level footfall count is higher/lower than expected |
| Pre-Requisites |
* Repeat Step 1 and 2 for all the device(s) of the site which is intended to collect site level footfall data |
| Checking Procedures |
Two options for accuracy check:
If there is any data inaccuracy symptoms observed from the above accuracy checking processes, raise a support ticket under "Data Accuracy Concerns" category to FootfallCam with the video proof(s) or screenshot(s) |
3.1.2 How-to Guide
3.1.2.1 Check Device Status and Accuracy Audit Stage
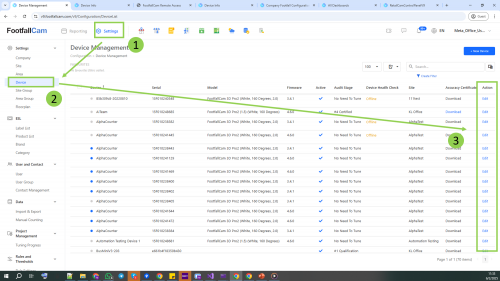
Step 1 - Go to Settings > Device Page and check on Devices Health Check if the device is tagged with "Offline" tag. If yes, perform the device offline troubleshooting.
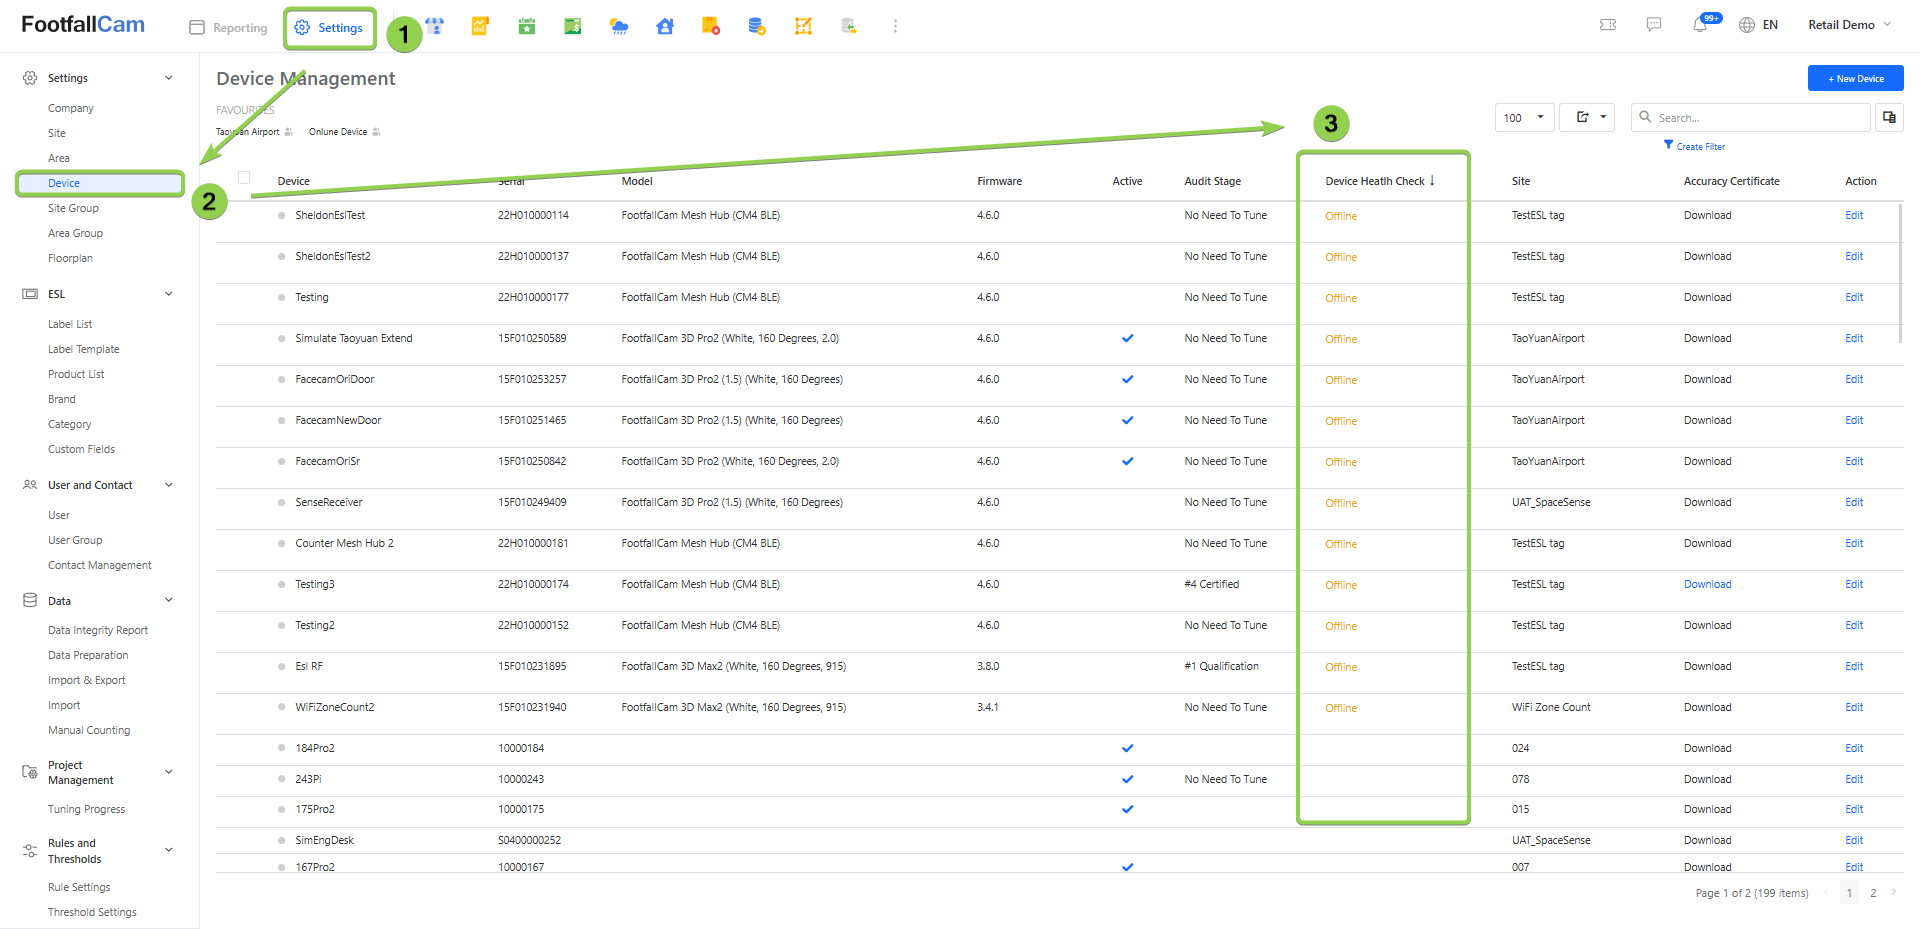
Step 2 - Click on Edit action link to go to the Device Settings page and check the following settings
-
Under Device Info tab, 'Active' is enabled
-
Under Settings tab, required counting usage(s) is enabled
-
Under Accuracy Audit tab, device is under '#3 Tuned' or '#4 Completed' stage
The following are the Accuracy Audit Stages for devices:
Noted:
- The data of a device is ready to be used only when its accuracy audit stage is either #3 Tuned or #4 Completed.
- As for the site data to be ready, all the active devices at the site must either be #3 Tuned or #4 Completed.
| Accuracy Audit Stage | Descriptions |
| #1 New | The device is newly allocated which requires usage and configuration confirmation. |
| #1 Ready to Tune | The device has been configured and is ready for tuning by FootfallCam. |
| #2 First Line Tuning | The tuning process of the device has been started and is expected to be completed within 3 working days under normal circumstances. |
| #2 Second Line Tuning | There is minor difficulty in tuning the device, requiring FootfallCam tuning specialist to look further into the issue. Please expect a minor delay in the accuracy audit completion date. (optional stage) |
| #2 Ticket Raised |
There is environmental constraints which restrain the accuracy audit process of the device from being able to be proceeded which requires action from client. Please refer to the relative support tickets for more info. (optional stage) |
| #3 Tuned | The device's settings have been refined and the data is ready to be used. In the meanwhile, FootfallCam will continue to collect sufficient sample size in order to prove the counting accuracy with video evidence. |
| #4 Completed | The device has successfully completed the accuracy audit with statistically significant sample size. Devices are expected to be completing accuracy audit within 7 working days under normal circumstances. Please click into the link to view the accuracy audit report. |
| No Need to Tune | Device's accuracy audit is put on hold due to testing purpose or constraints not being able to resolved, which would result in inaccurate counting for the device. |
| Reseller to Tune | The accuracy audit of the device will be carried out by FootfallCam Partner. |
3.1.2.2 How to remotely view Device Live View
The Live View is the current point-of-view of the camera. With the Live View, the user can:
- Observe the live footage from the camera and adjust the placement of the camera if necessary.
- View the placement of the In-Out line on the live footage and observe how the "In" and "Out" counts are triggered.
The feature of remotely viewing the Live View allows users to observe the footage on FootfallCam V9™ without needing to be in the vicinity of the camera. The live footage of counts being triggered also helps the user to instantly identify any factors affecting the accuracy of the counting, for example, a change in the environment covered by the camera that has significantly altered the path of human traffic.
If a user doesn't observe the Live View of his camera, he will not know if the camera's coverage and the In-Out Line are in the optimal configuration.
To remotely view the Live View, follow the steps below:
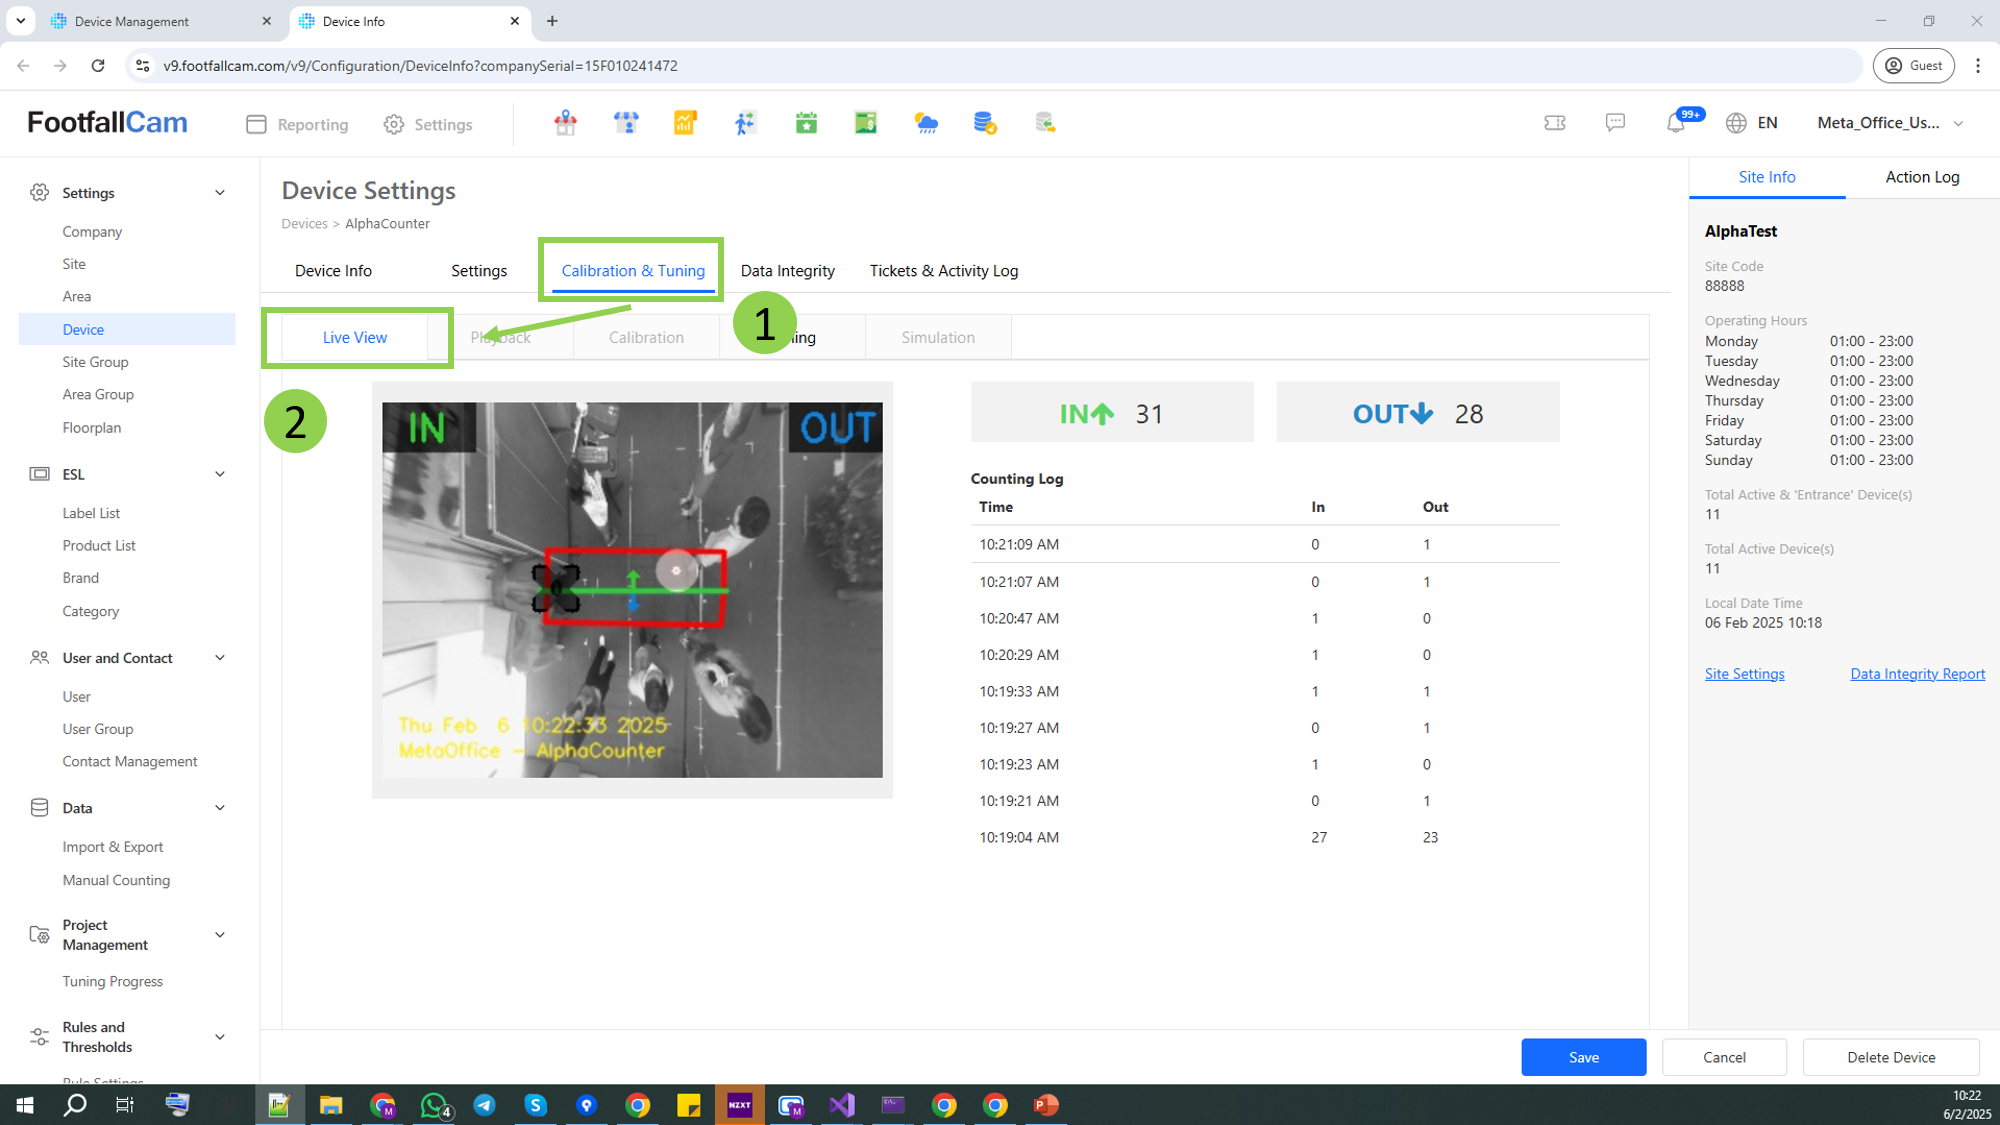
- Click "Settings" in the top navigation bar. Then, under "Settings" in the left navigation bar, click "Device". After that, navigate to the row of the device to observe and click "Edit" on that row.
- Use any one of the following methods:
- Method 1: Viewing in FootfallCam V9™
In the "Device Settings" page, click the "Calibration & Tuning" tab. Then, view the "Live View" tab.
- Method 2: Viewing via Setup Wizard
- Method 1: Viewing in FootfallCam V9™

Step 1 - In the "Device Settings" page, click the "Settings" tab. Then, scroll down to the "Security & Privacy" section.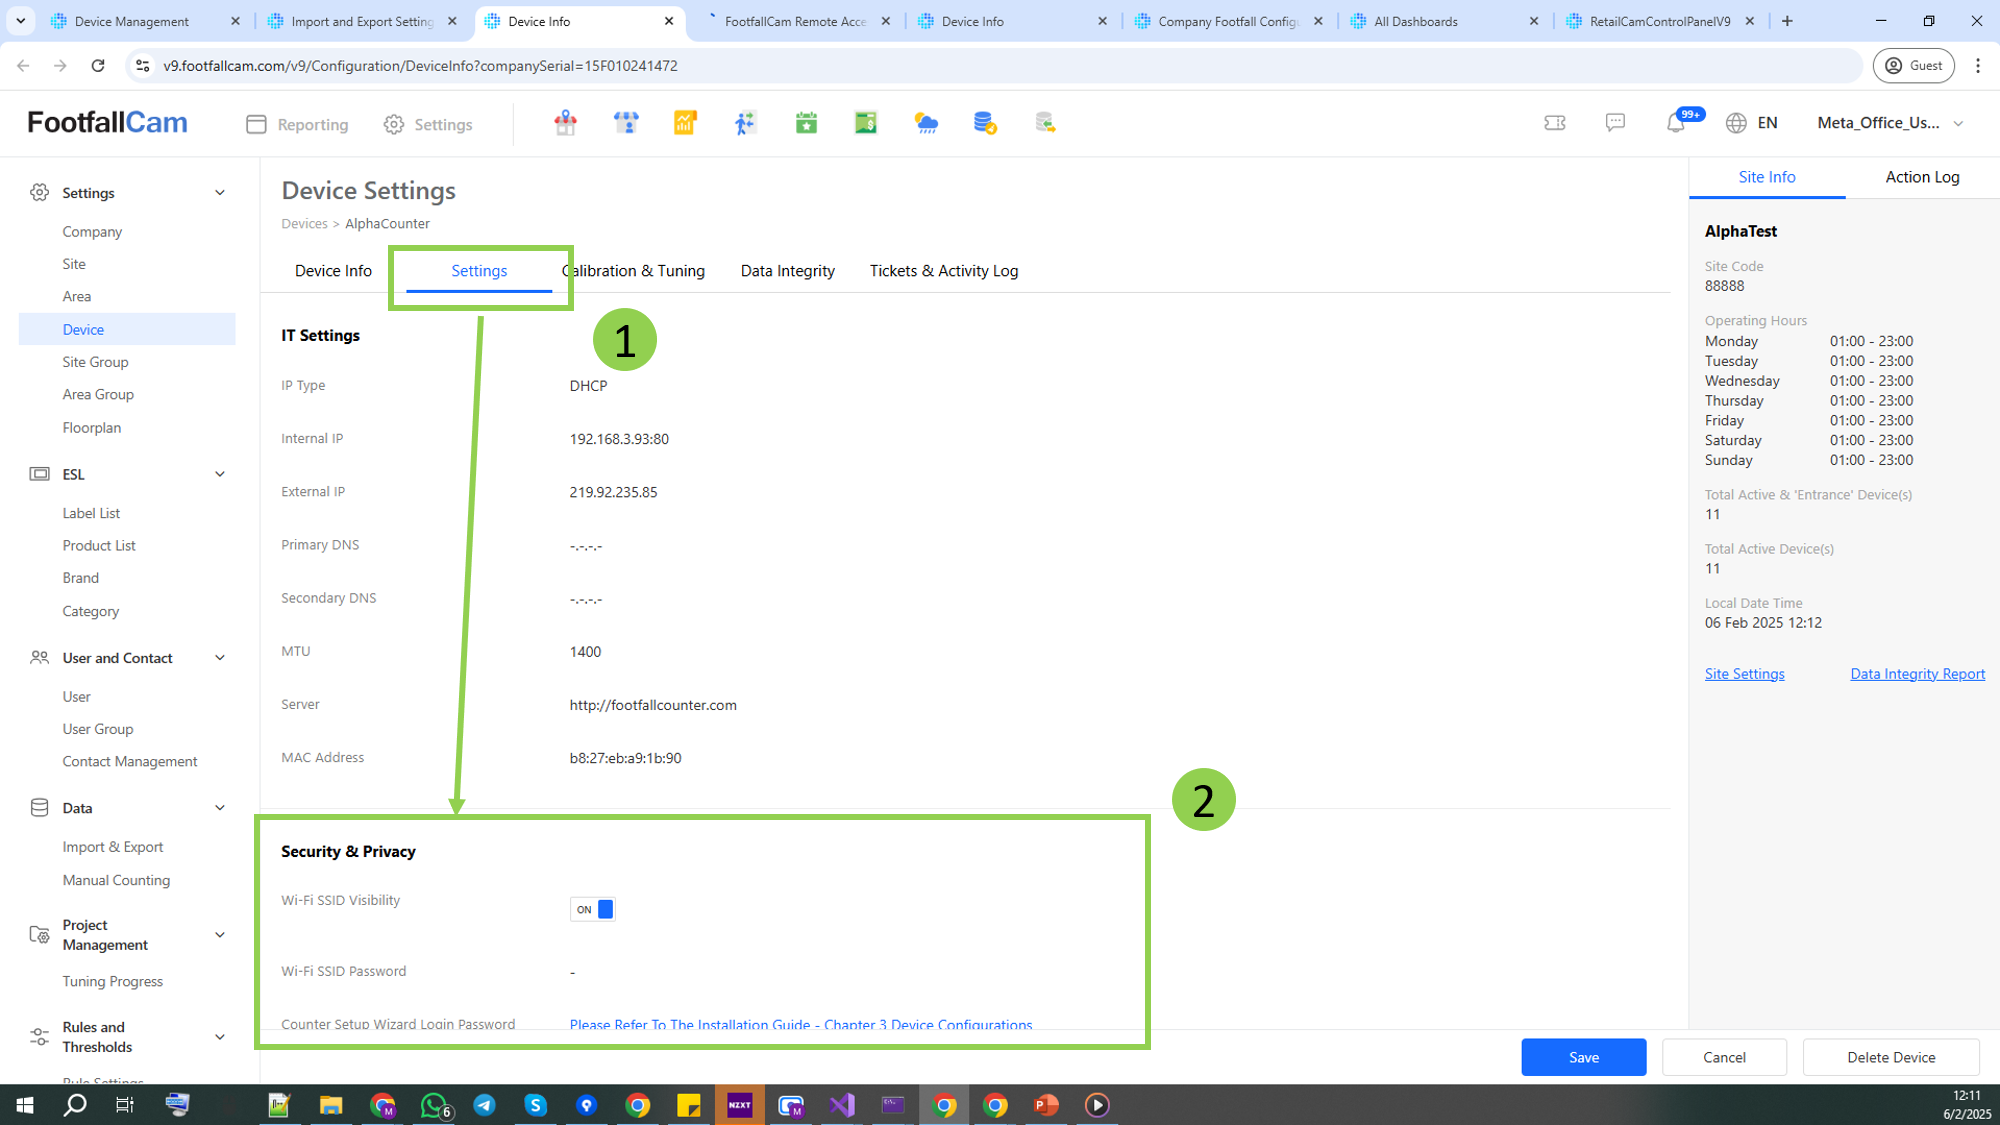
Step 2 - If the "Remote Access" selection is not set to "On", turn it on, click "Safe", and refresh the page.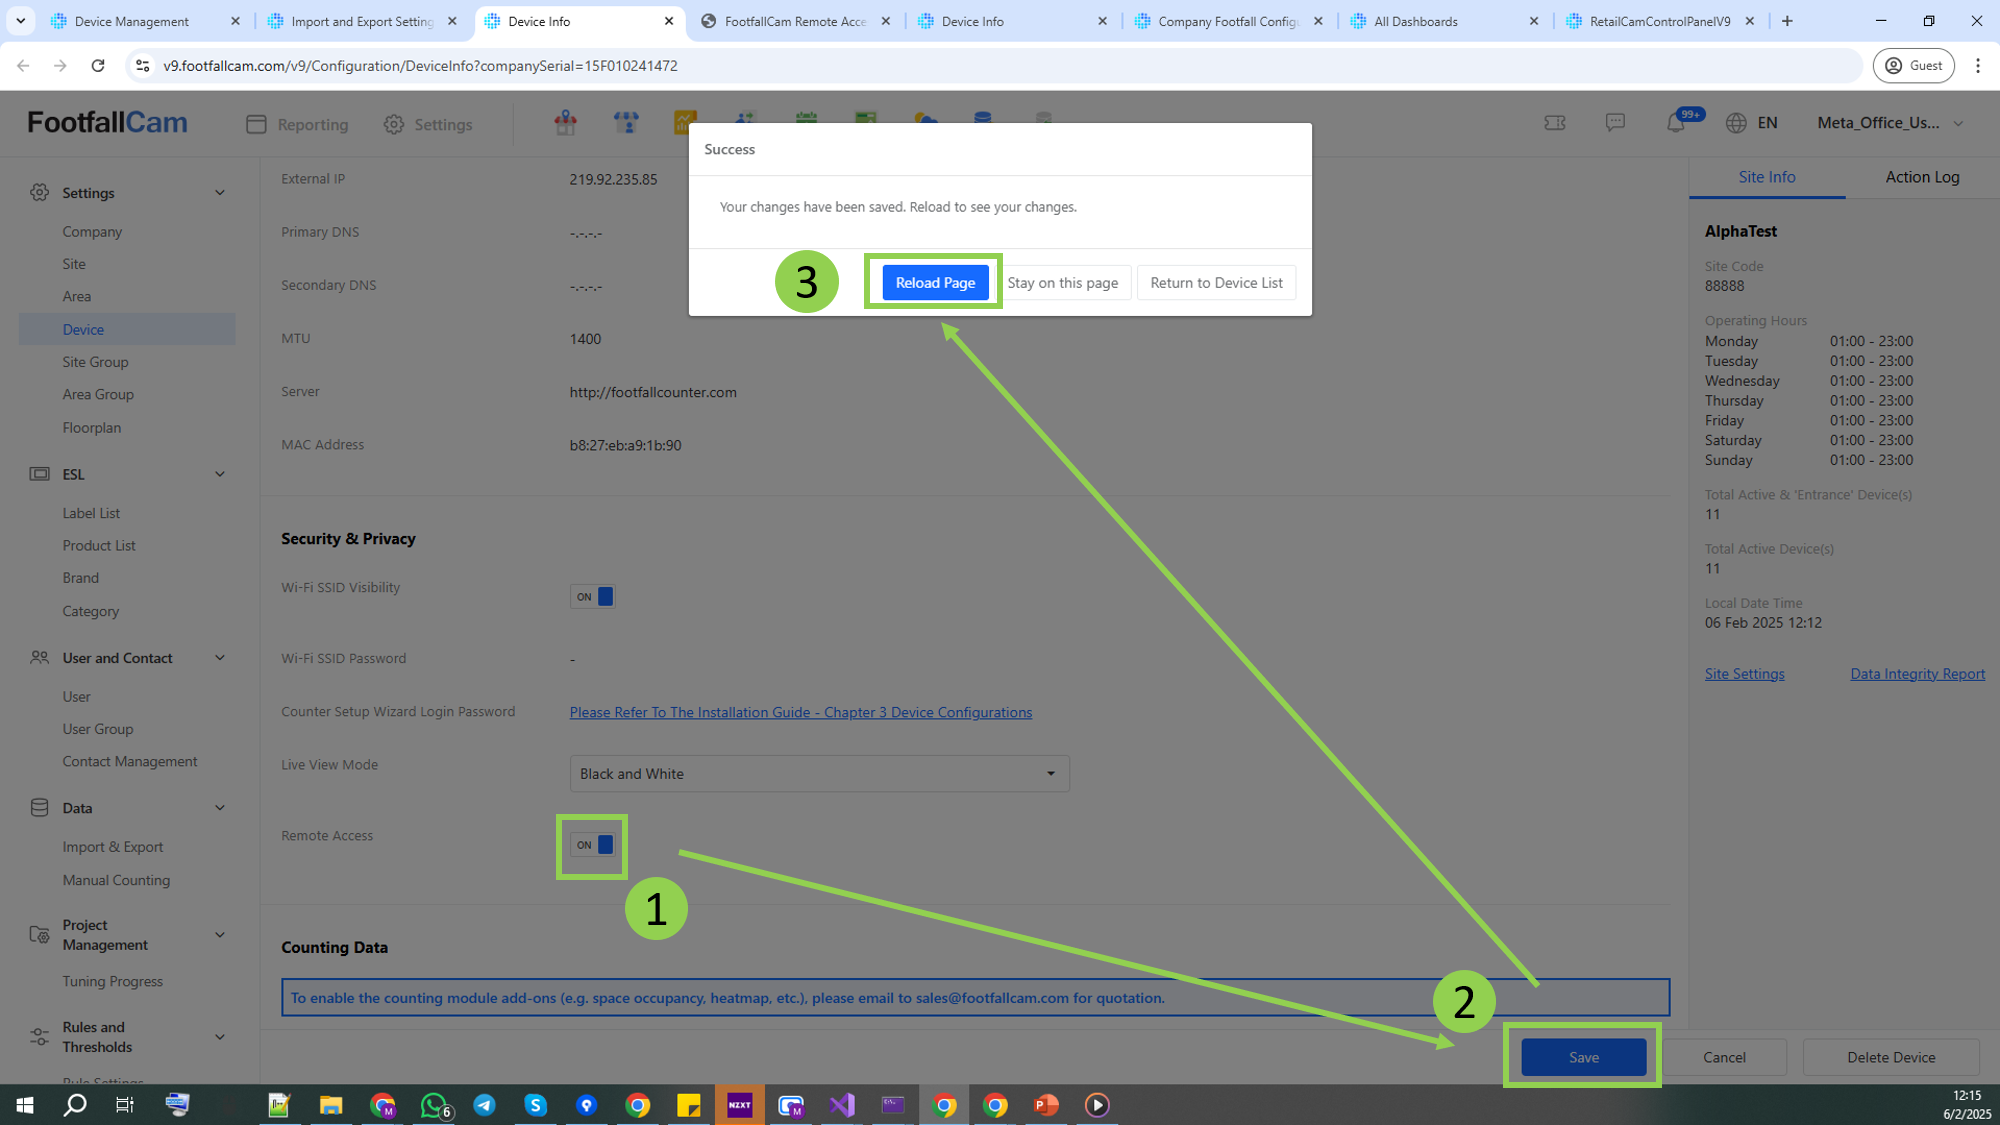
Step 3 - Click on the link shown in the "Remote Access URL" field.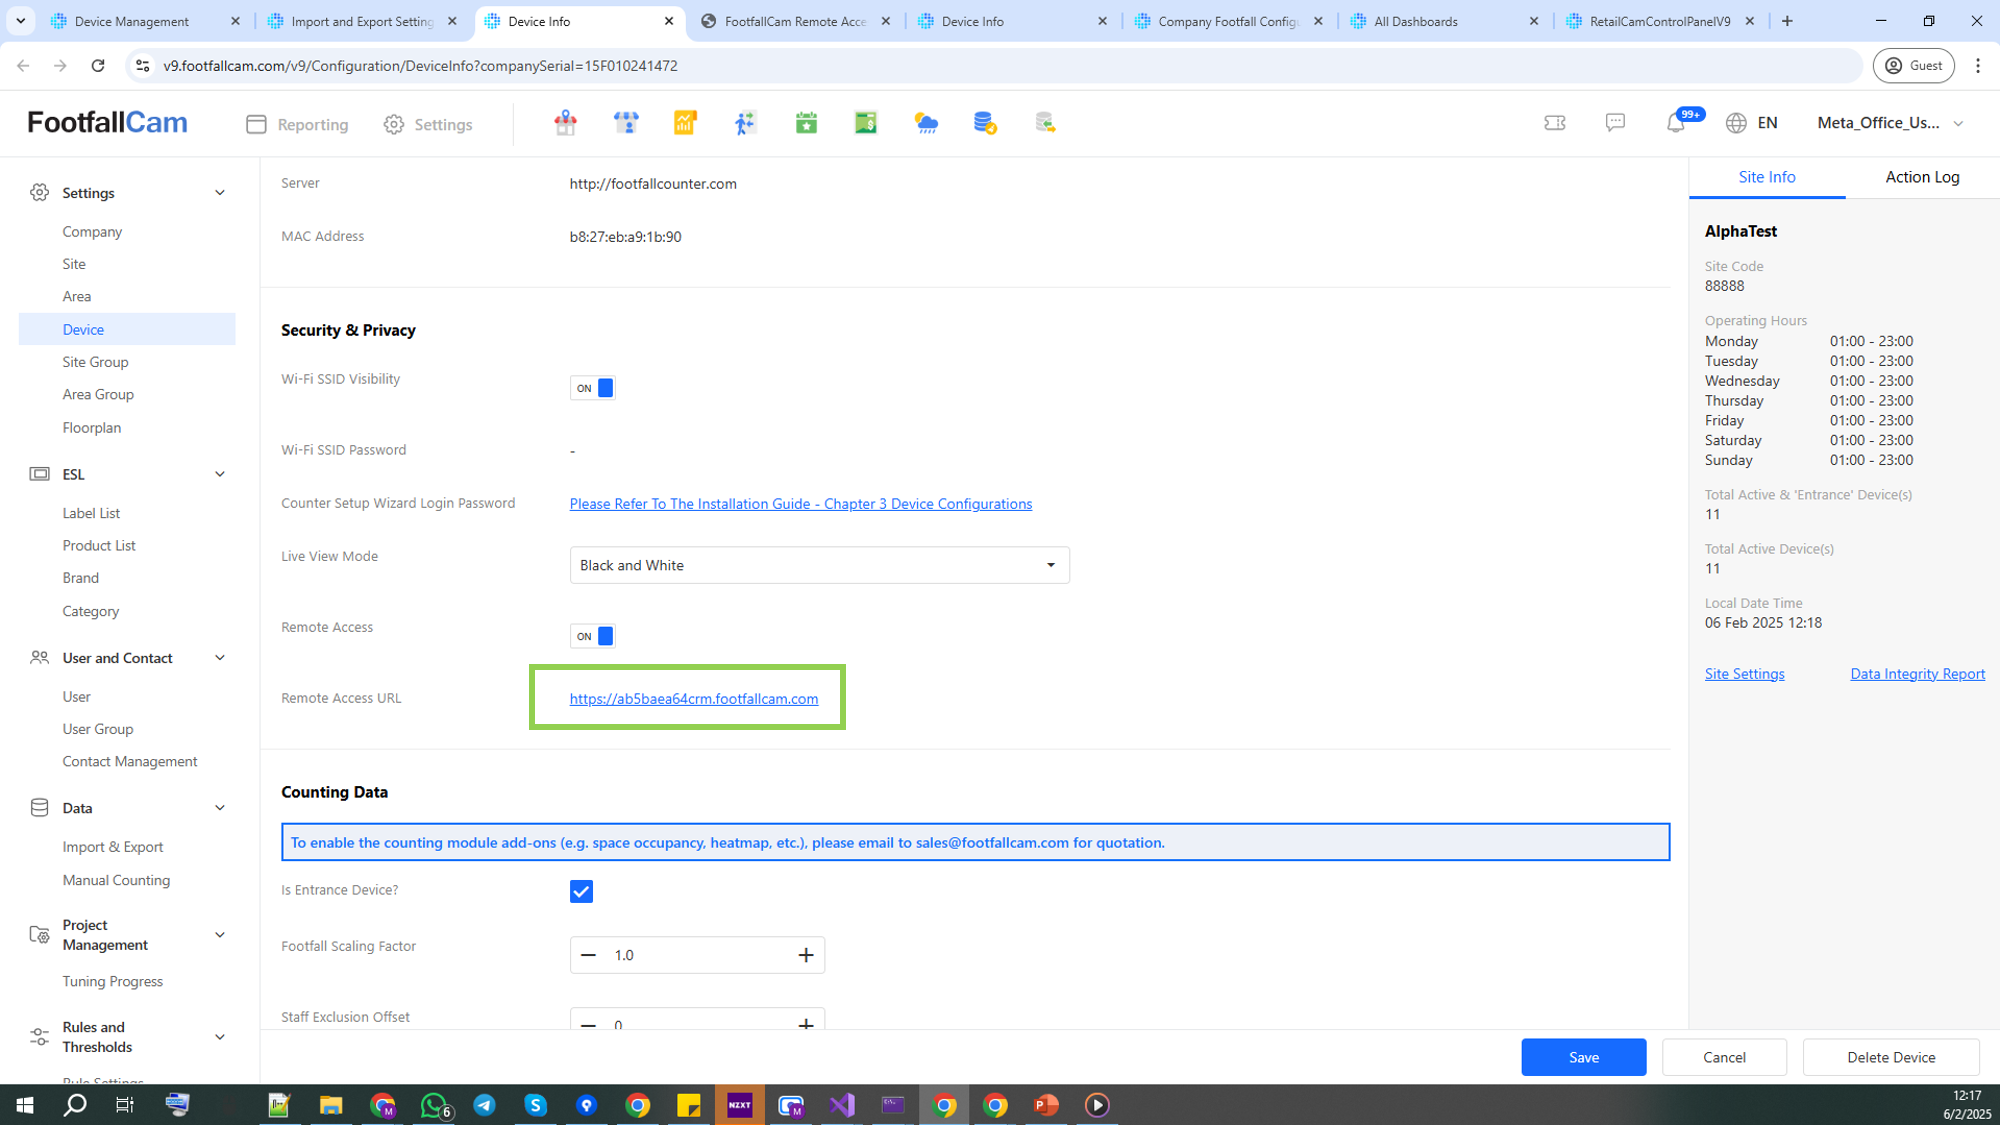
Step 4 - You'll be redirected to the device's Setup Wizard where you may log in. If you've forgotten your password, kindly contact "[email protected]".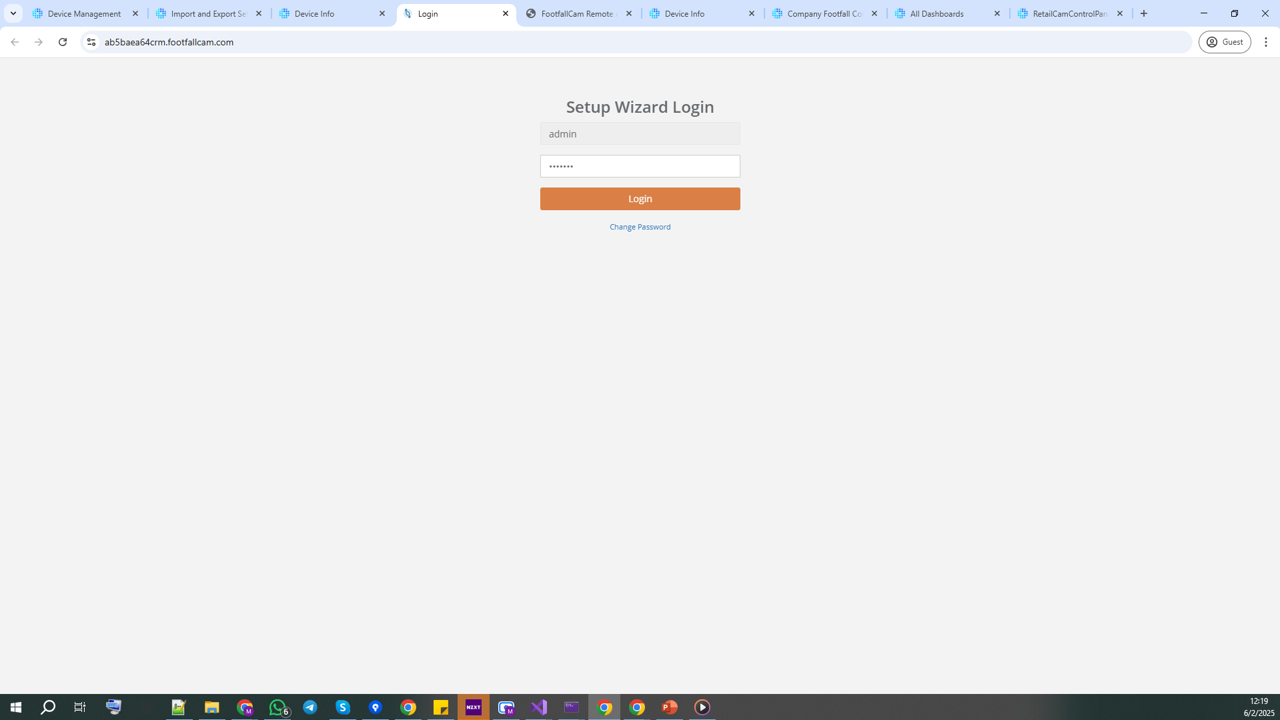
Step 5 - You can now remotely observe this device's Live View.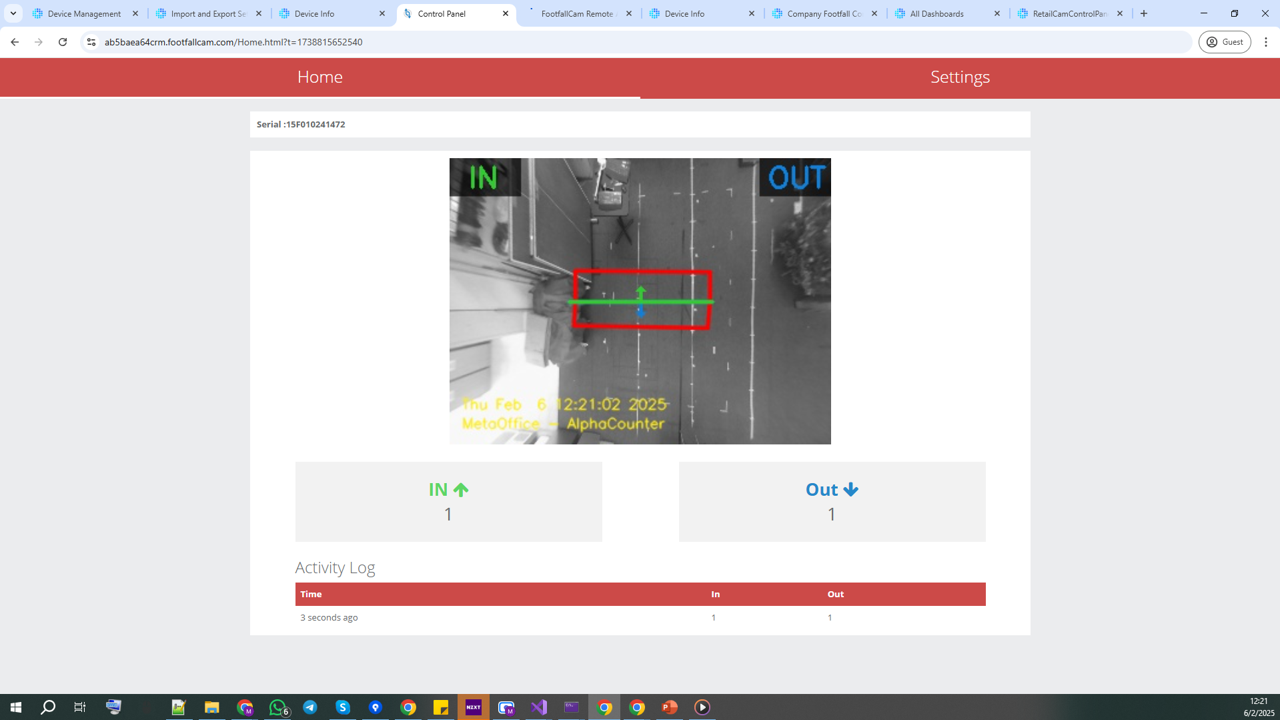
3.1.2.3 Accuracy Audit
3.1.2.3.1 View Accuracy Audit Report
This report allows users to verify footfall data accuracy, ensure data reliability, and support business decisions with 100% accuracy validation and video proof. There are two methods to view the report:
Method 1 - Directly click on Download in the Device Management page.
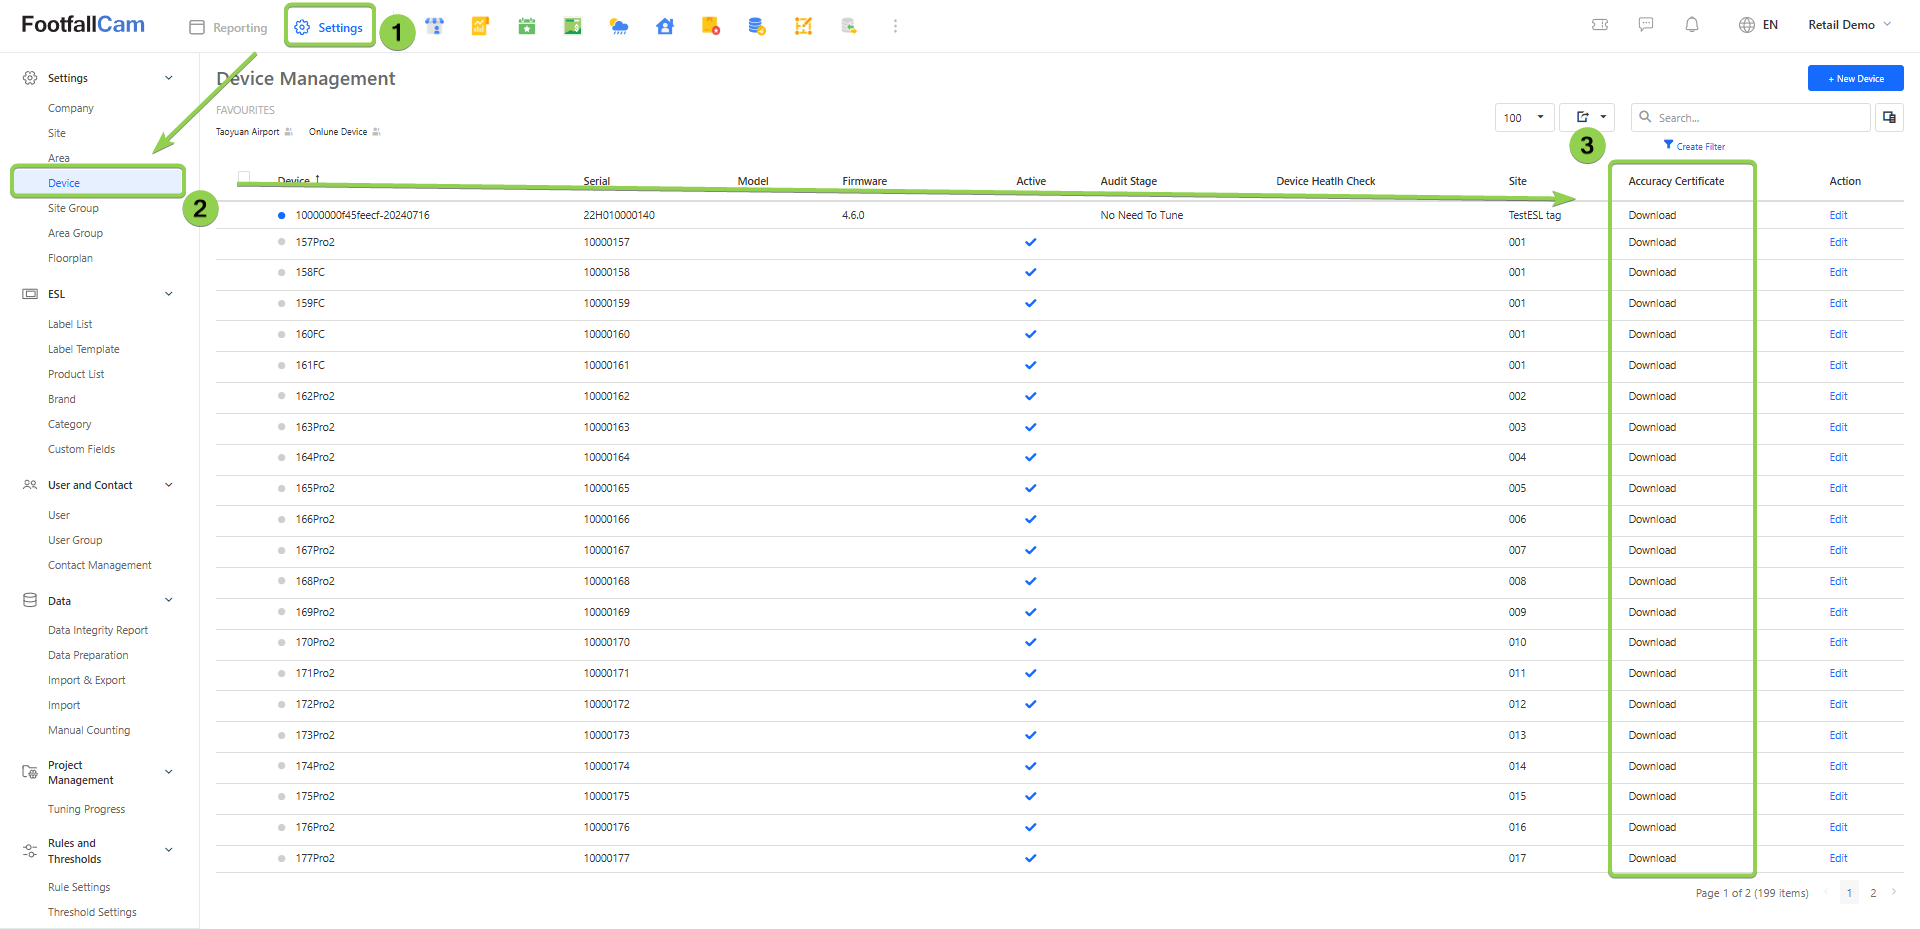
Method 2 - Click on the View to be redirected to the corresponding accuracy report in Device Settings page (please refer Chapter 2: Device Management section 2.2.2.1.4).
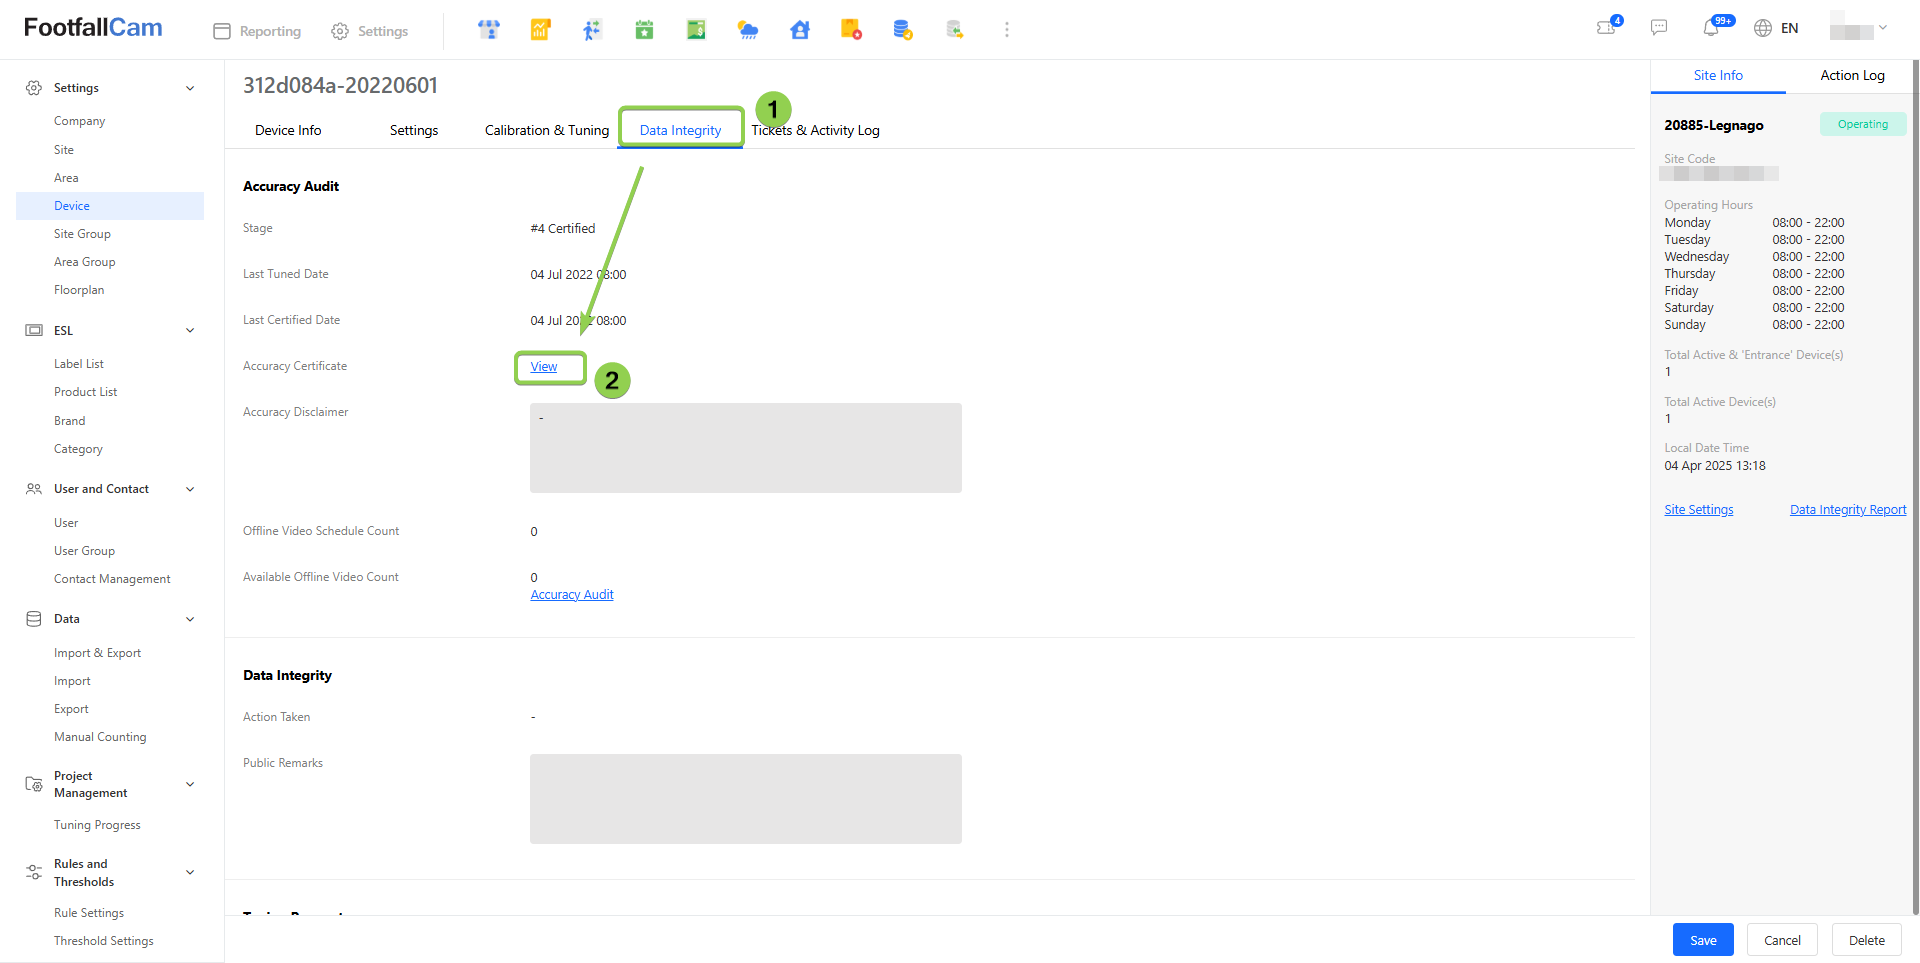
After clicking Download or View to go the Accuracy Report page. The Summary and Validation Video will be displayed in this report. This report is accessed through a public URL, so downloading it directly as a PDF is not supported. However, you may right-click on the page and select "Save as" to download the report as an HTML file to your local file.
3.1.2.3.2 Self Accuracy Auditing
The user can perform accuracy auditing on his own initiative if he wishes to validate the counting accuracy of a counter by executing the following steps.
Noted:
- Recorded videos will be temporarily stored for a maximum of 7 days.
- Verified videos will be temporarily stored for a maximum of 30 days.
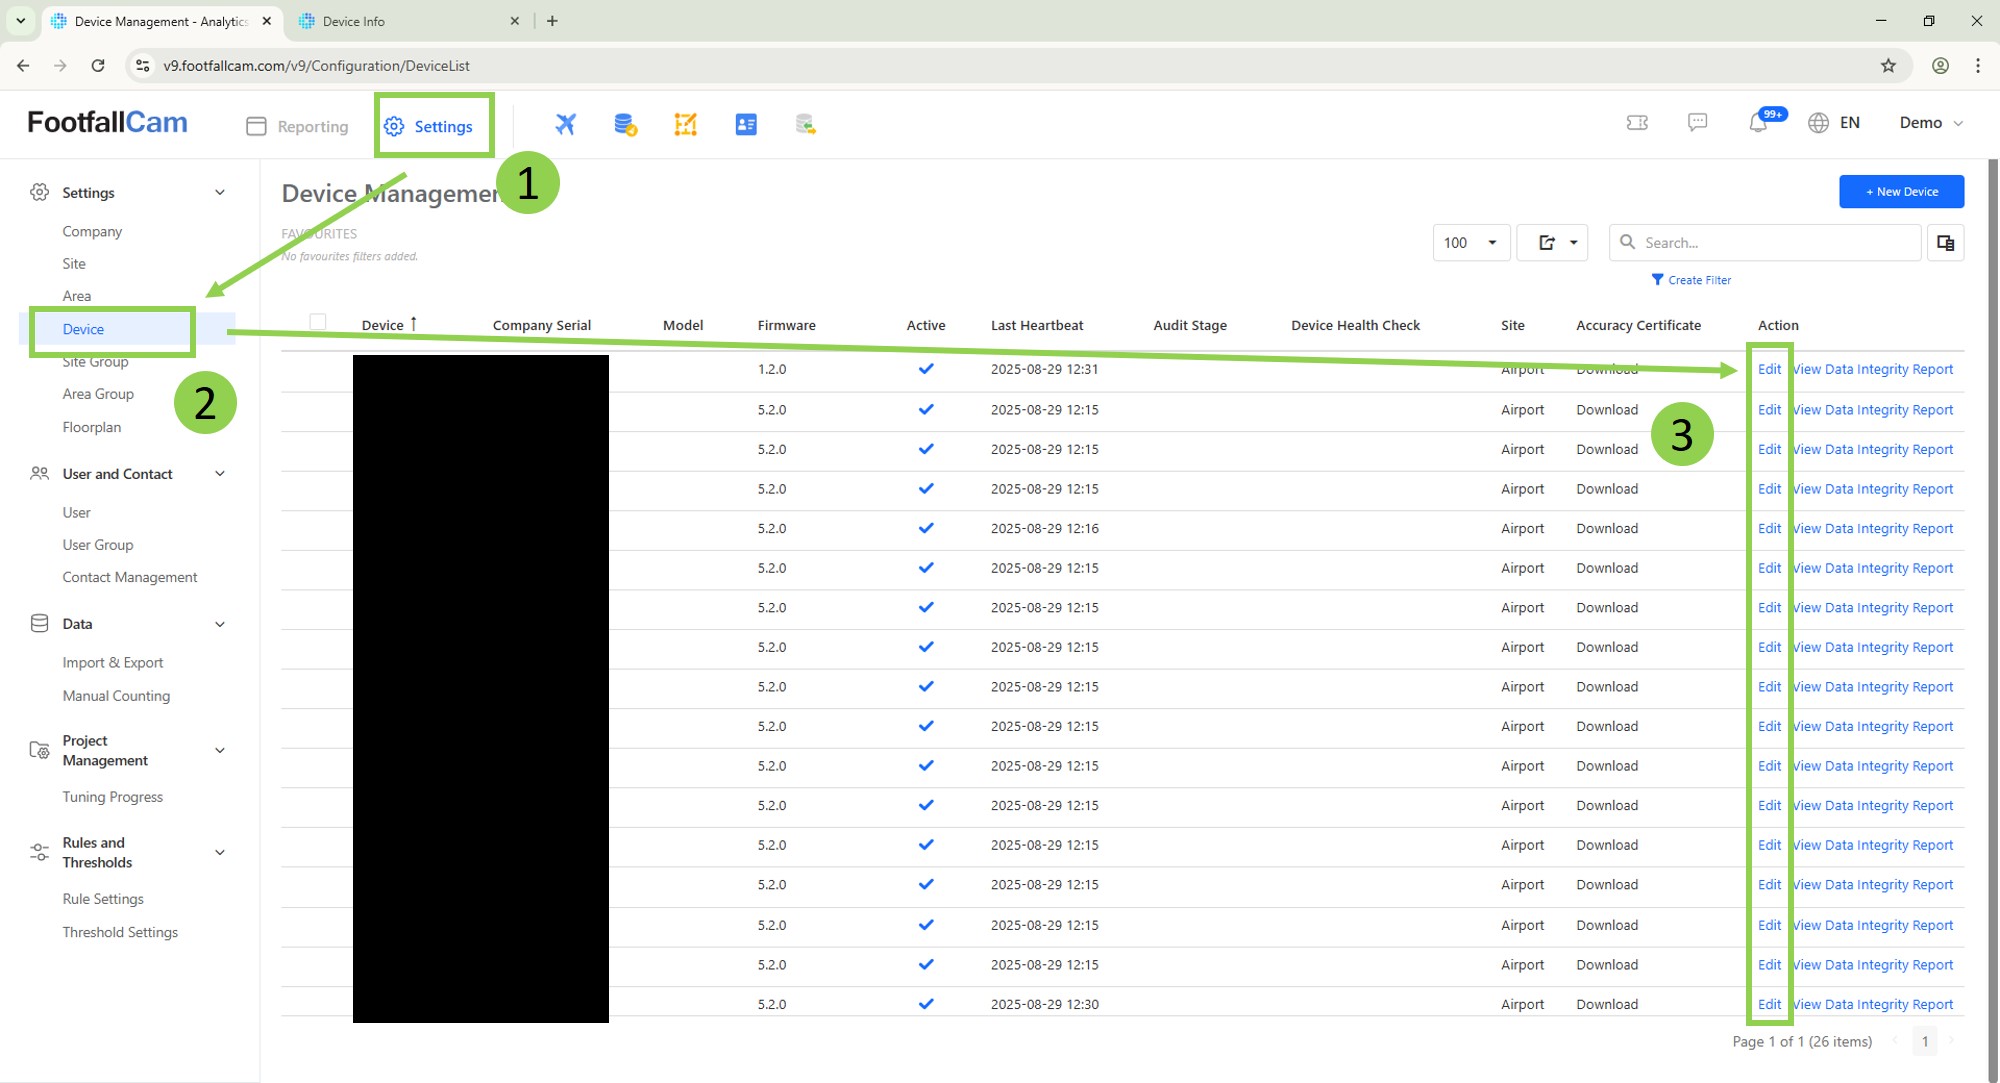
Step 1 - In "Settings" > "Device", click the "Edit" link of any device that you would like to audit. You will be brought to the "Device Settings" page.
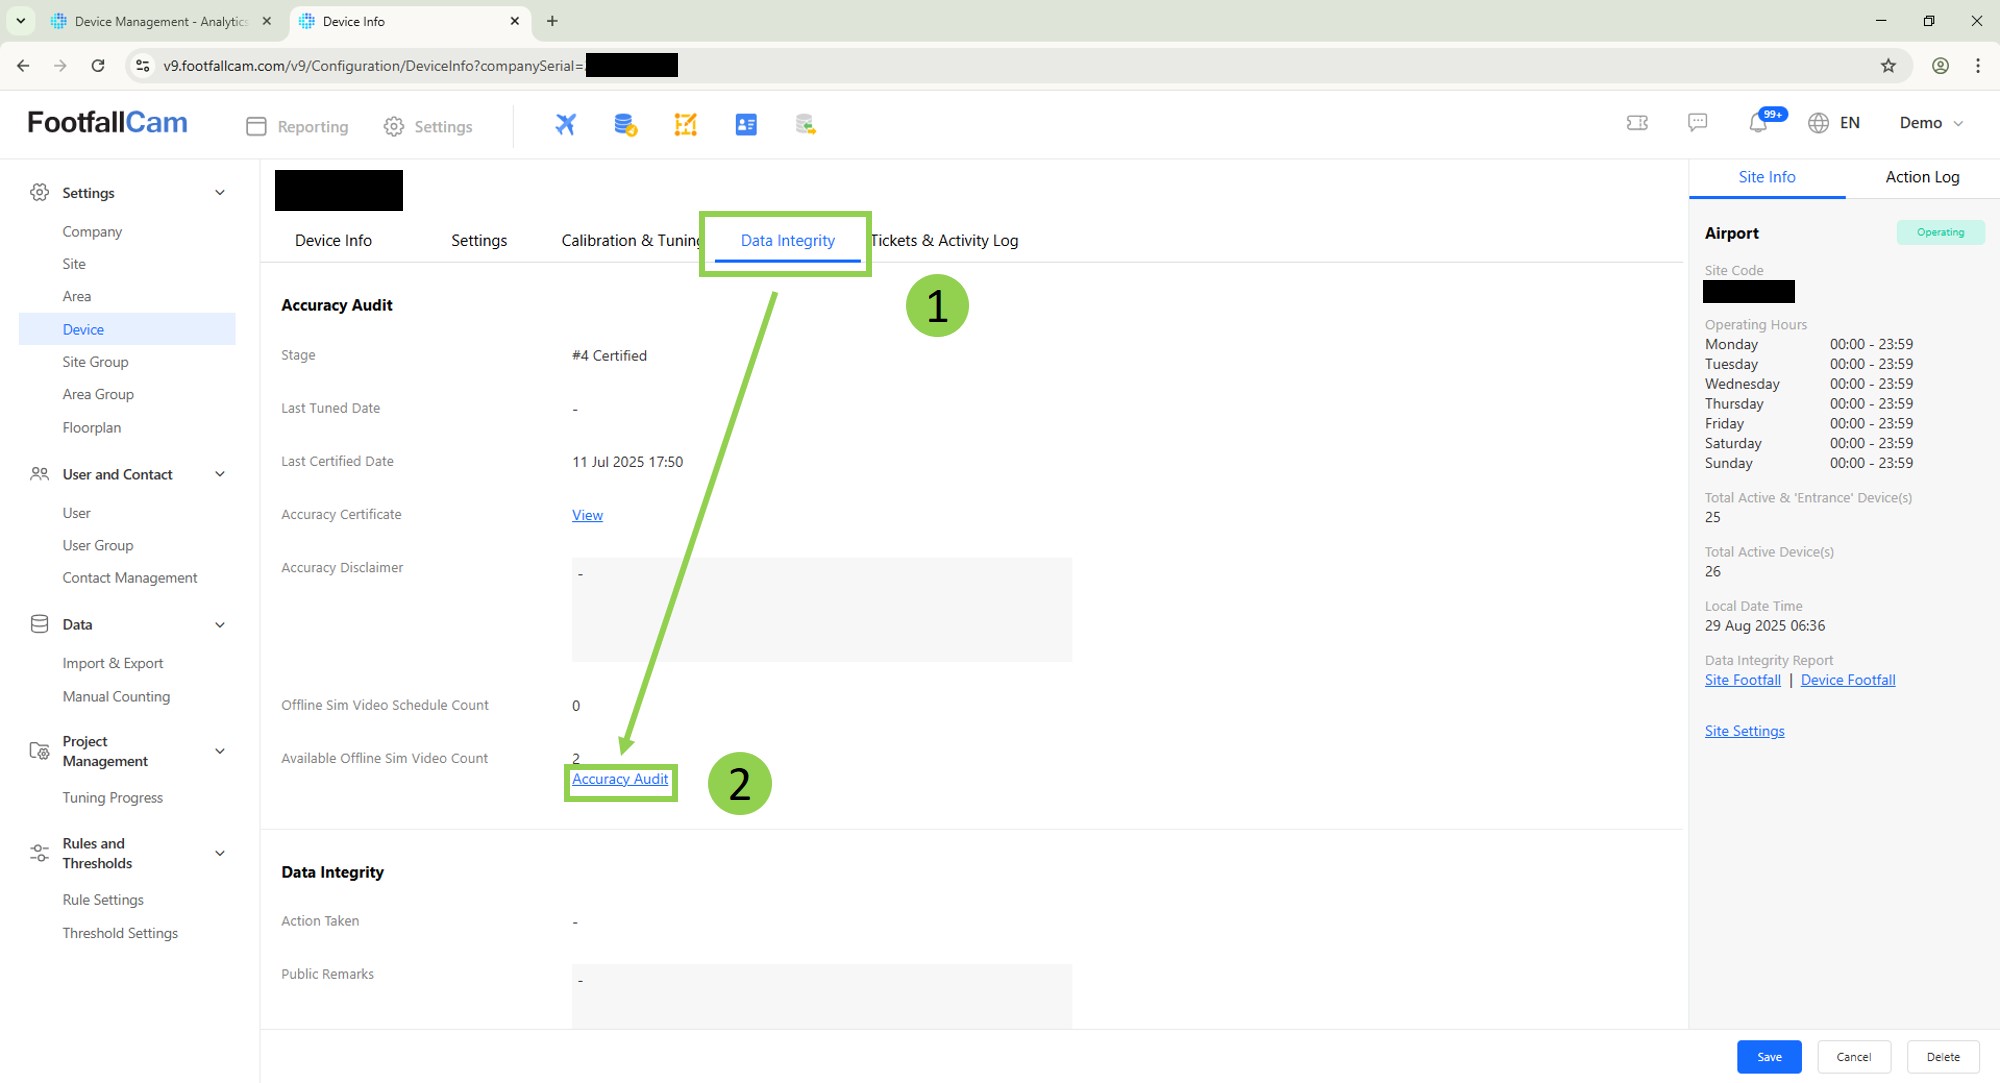
Step 2 - In "Device Settings", in the "Data Integrity" tab, under the "Accuracy Audit" section, click "Accuracy Audit".
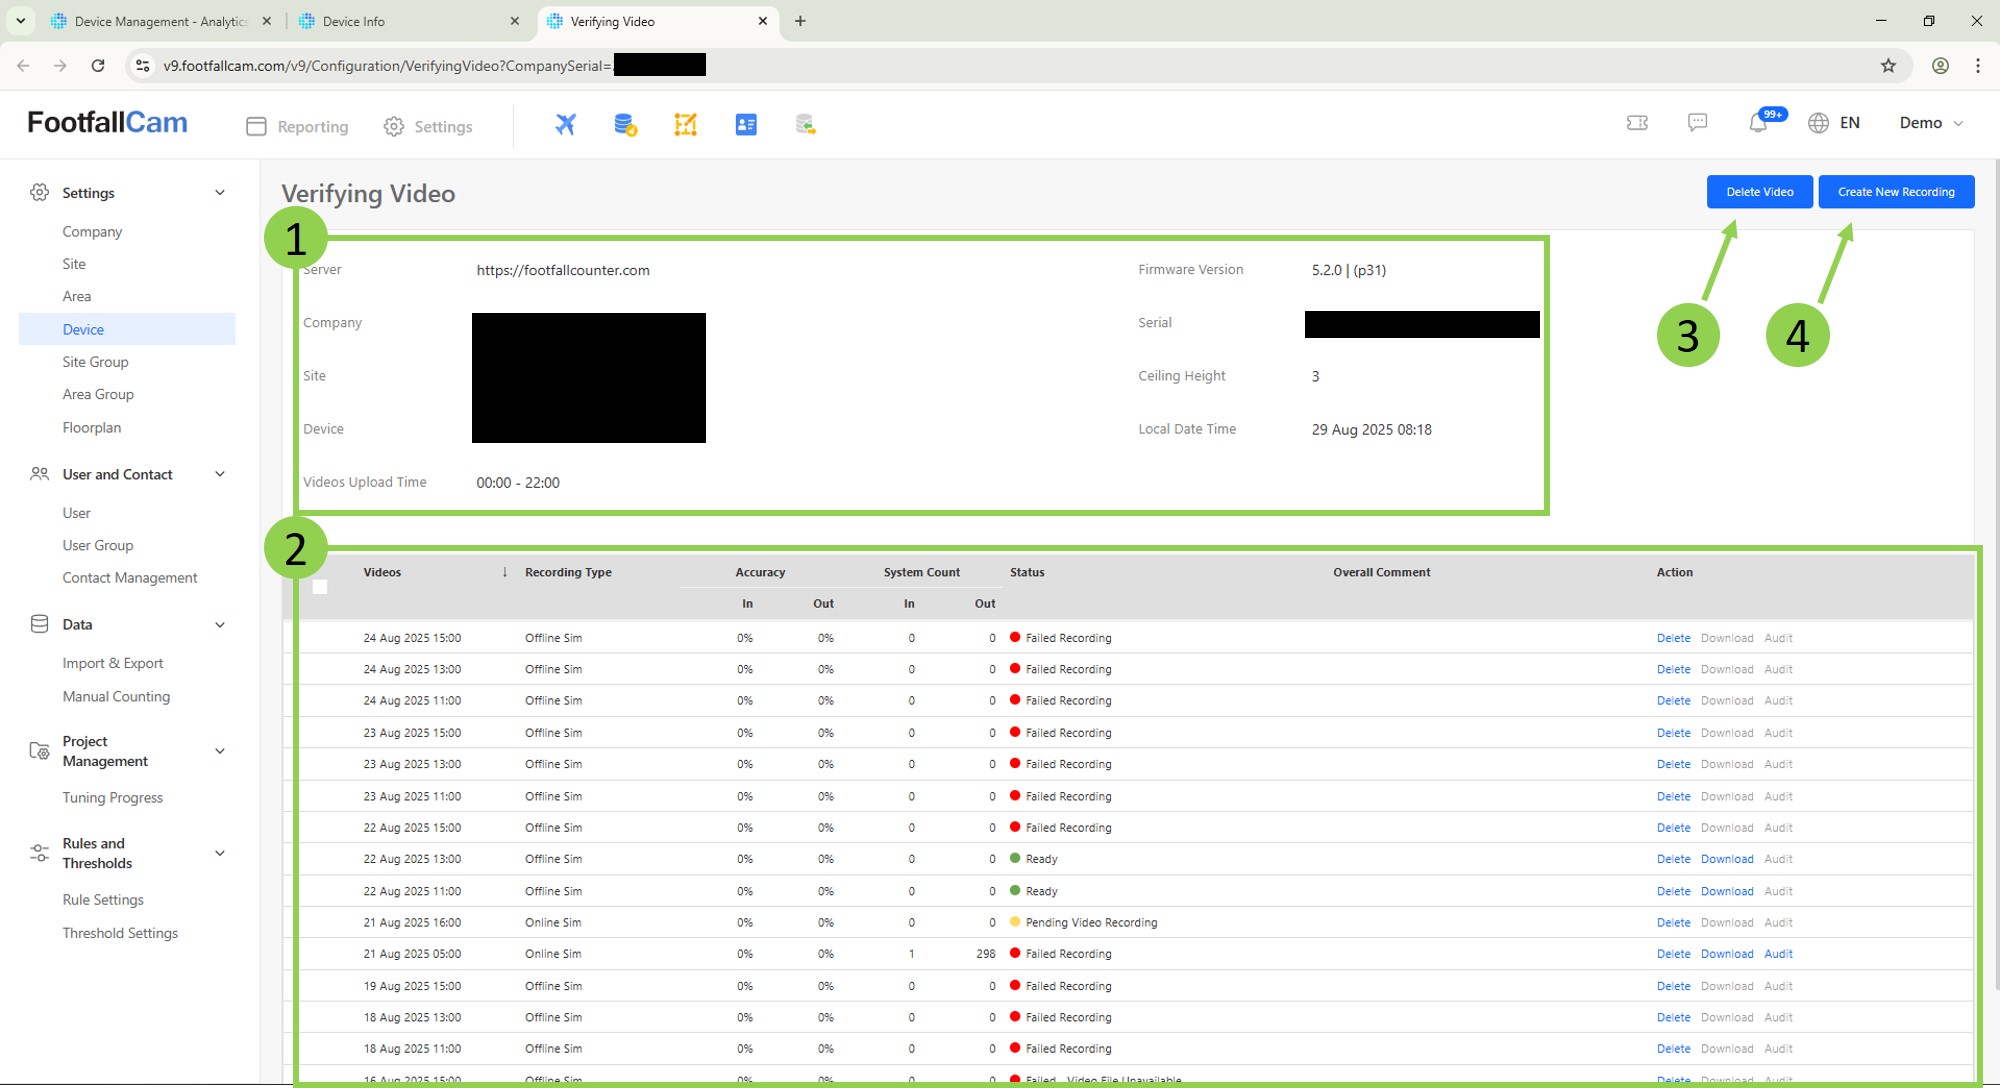
Step 3 - You're now redirected to the "Verifying Video" page. You can observe the details of this device and several features of the workspace.
| 1 | Device Details. |
| 2 | List of recording schedules. |
| 3 | Button to delete the selected recordings. |
| 4 | Button to create a new recording. |
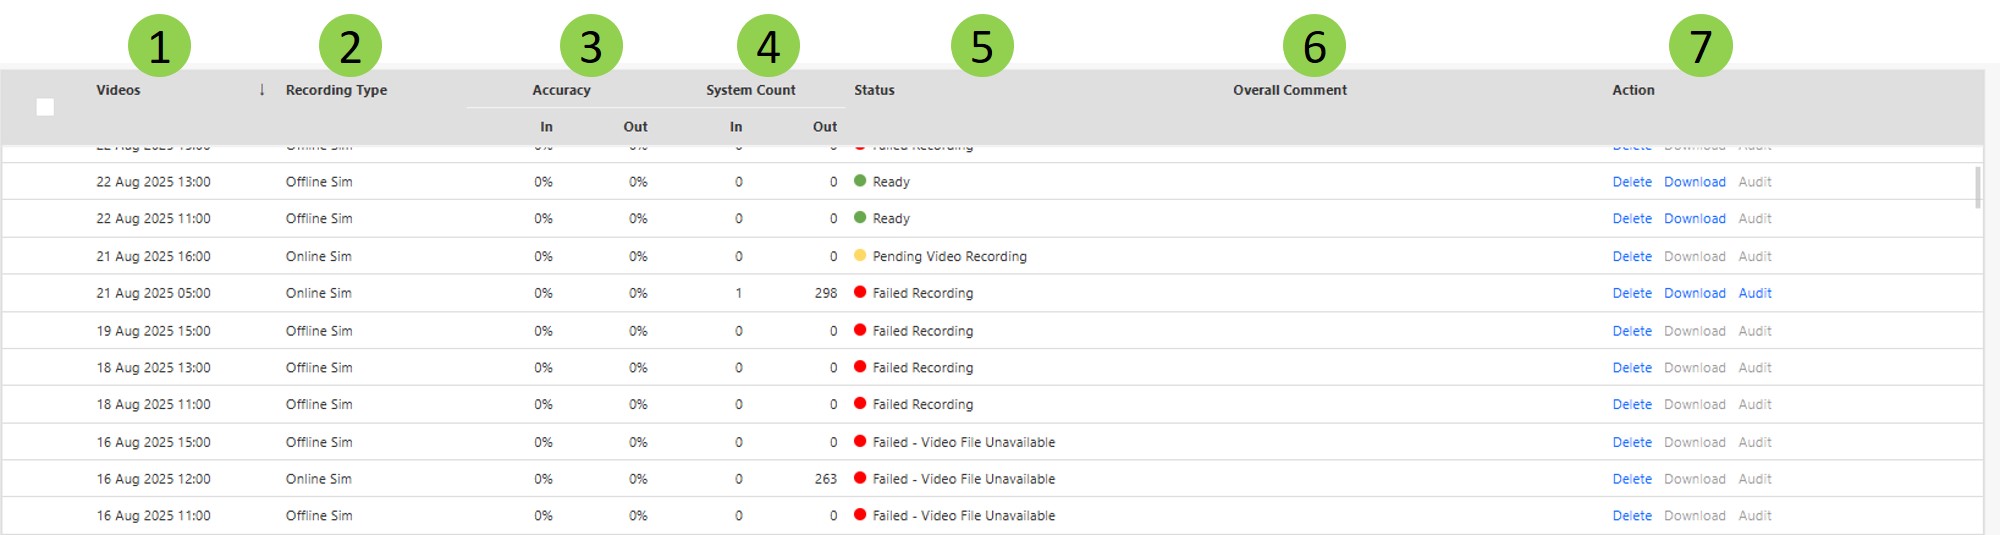
The following are the details of the columns in the list of recording schedules.
| 1 | The scheduled time of the recording. |
| 2 | Recording type, either "Online Sim" or "Offline Sim". |
| 3 | Accuracy of the recording, divided by "In" and "Out" traffic. |
| 4 | The number of "In" and "Out" footfall as counted by the system. |
| 5 | The status of the recording. |
| 6 | A comment on the recording, if any. |
| 7 | Actions (Will be explained in the following sections) |
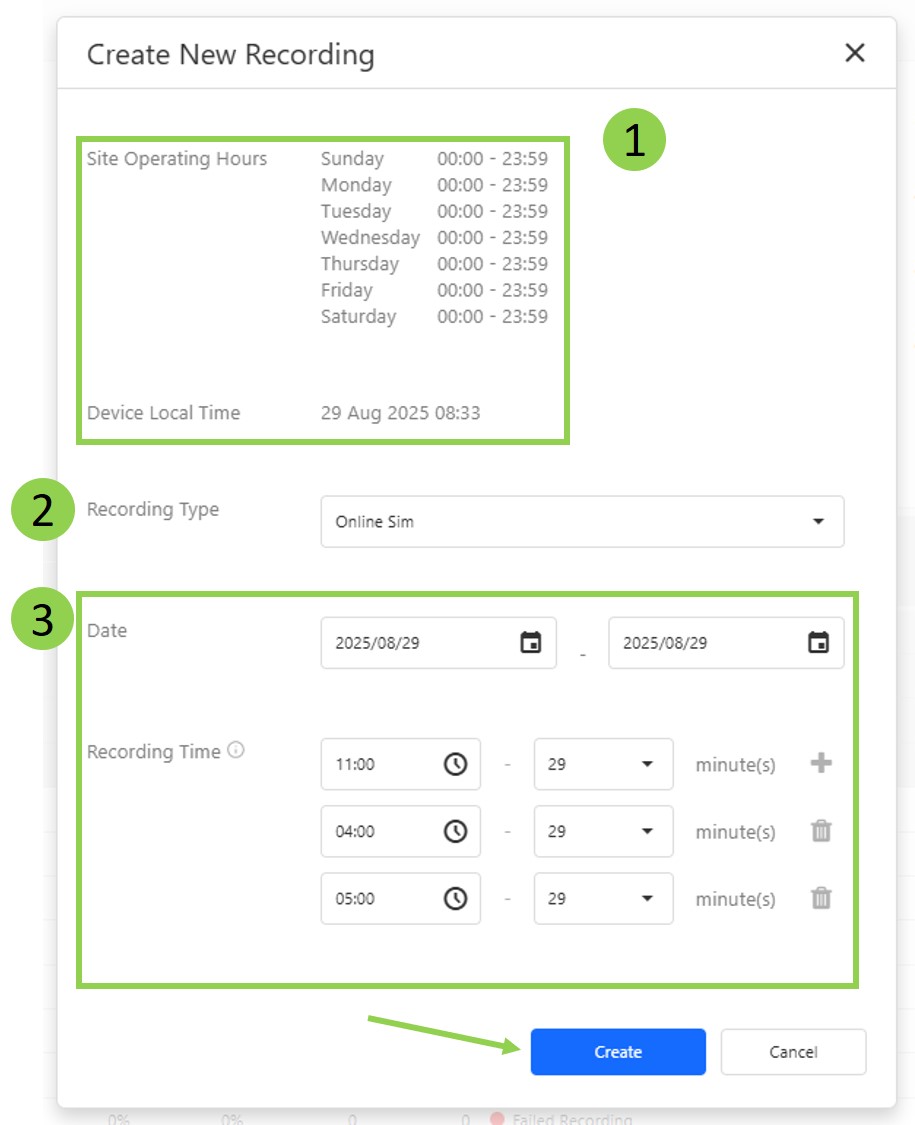
Step 4 - To begin the verification process, click the "Create New Recording" button to schedule a new recording and observe the pop-up.
| 1 |
Site Operating Hours: The conventional operating hours of the site to which this device belongs. Device Local Time: The current time in the device's time zone. The user can compare this against the "Site Operating Hours" to decide when to schedule the videos. |
| 2 |
Select the Recording Type. Online Sim: Produces a playable MP4 recording. This recording is used for "Self Accuracy Auditing".
*The user should select "Online Sim", as an "Offline Sim" cannot be used for "Self Accuracy Auditing." |
| 3 |
Select the Date and Recording Time of the recording. The user can schedule videos to be recorded at multiple times across multiple days. For example, if the user schedules between 14 August 2025 to 16 August 2025 at three times: 11:00, 13:00 and 18:00, three schedules per day will be produced, totalling 9 schedules. The three initial recording times are provided by the system. These are the periods when traffic is expected to be the highest, and the user can schedule during these hours for a greater chance of getting a large sample size of footfall. If the user wishes to add or subtract any recording times, they can do so by clicking the "➕" or "🗑️" buttons. |
After keying in all the details, click "Create". The page will be refreshed after the schedule(s) have been successfully created.

Step 5 - After the page has been refreshed, the user can observe that the newly added schedules will be added to the list of schedules below.
The user can delete a schedule at any time. Alternatively, the user can select multiple rows to be deleted in bulk.
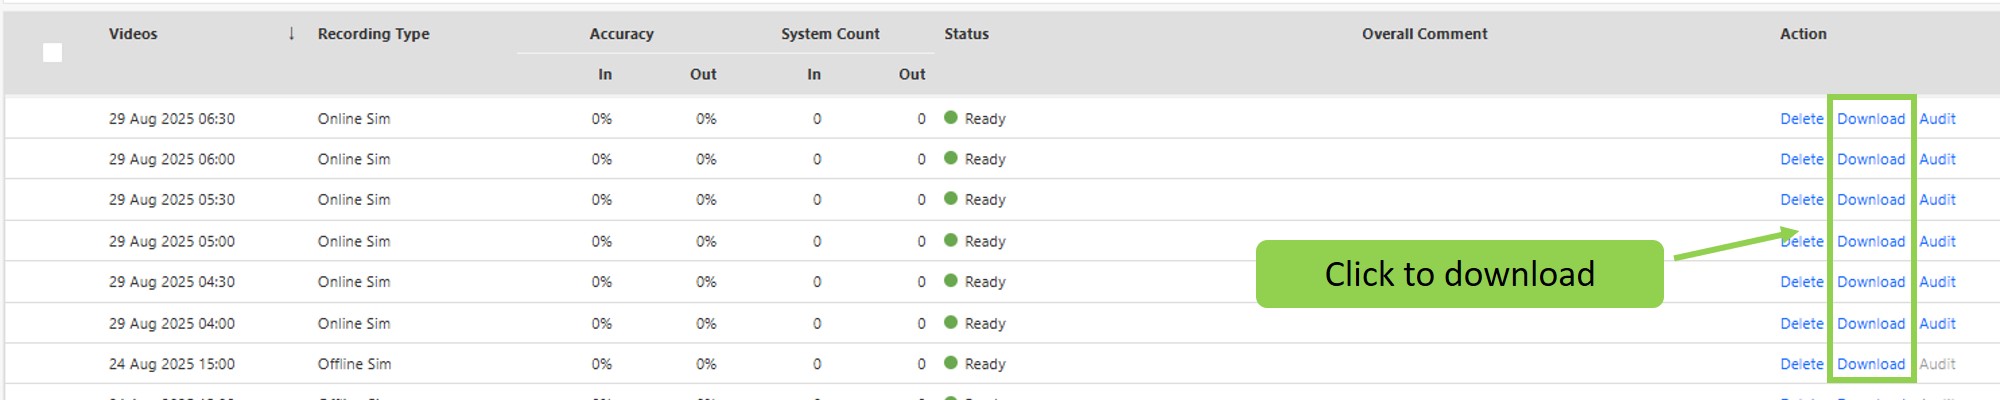
Step 6 - When a schedule has been successfully executed, the user can download the scheduled files. The files will be available for a maximum of 7 days.
When the scheduled file is a video, you will be redirected to a separate link for downloading or viewing it.
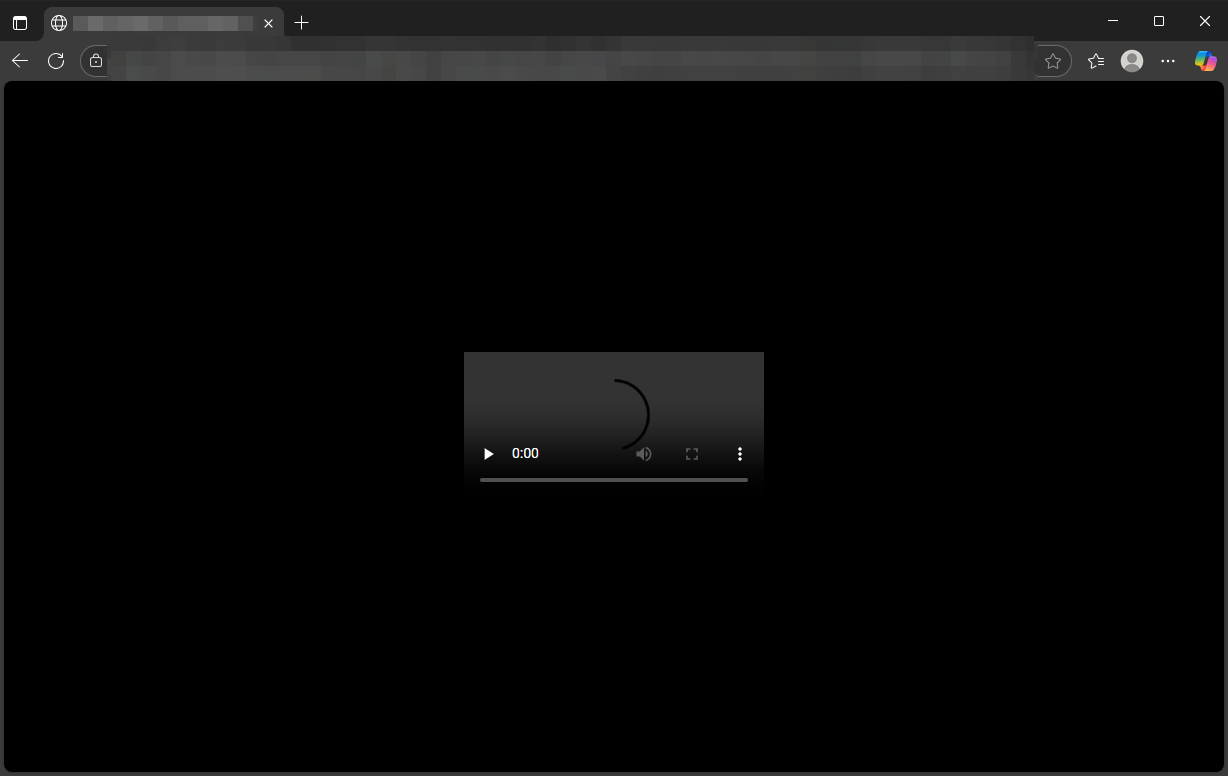
If the video does not load or play correctly, try the following solutions:
Option 1: Try a different browser
Reopen the same download link using one of these browsers:
- Google Chrome
- Mozilla Firefox
- Brave
Avoid using Microsoft Edge or other unsupported browsers, as they may not display the video properly.
Option 2: Open the video using VLC Media Player
- Open VLC Media Player.
- Click "Media" on the top menu.
- Select "Open Network Stream...".
- Paste the video URL into the input box.
- Click "Play" to stream or download the video.
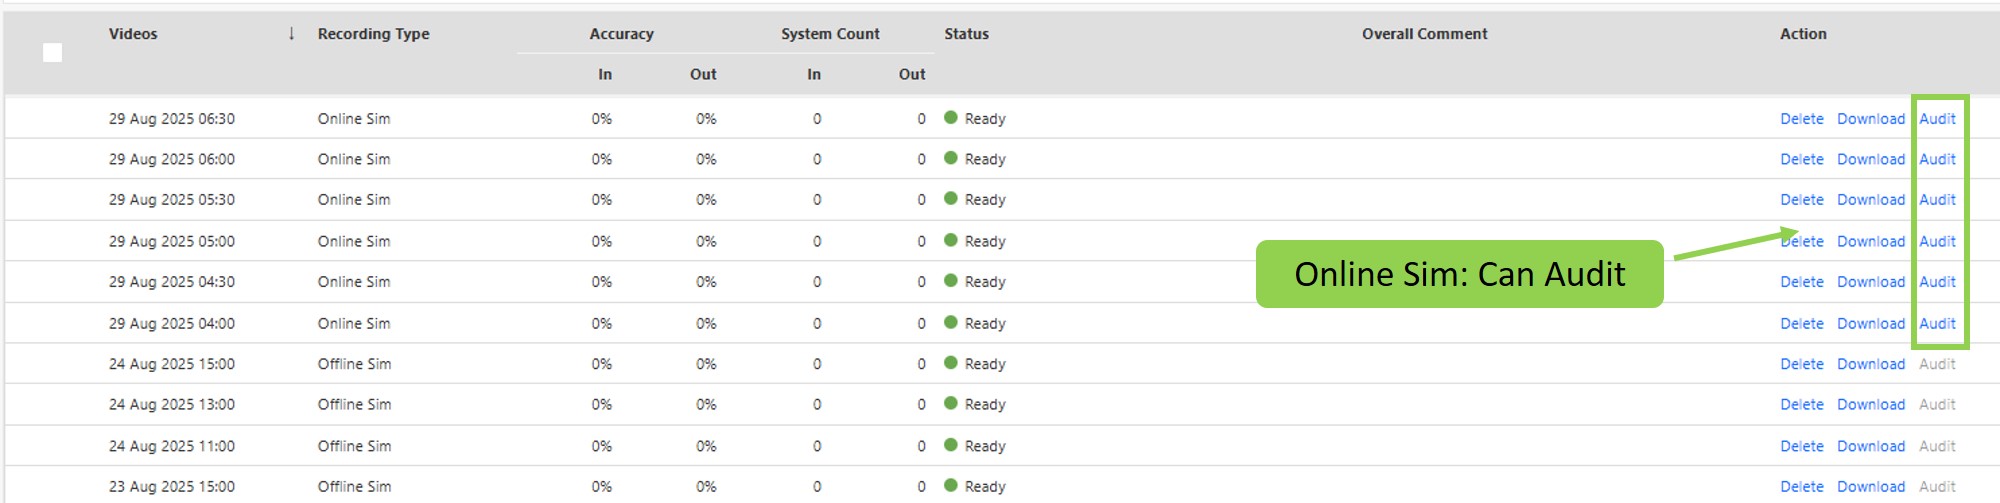
Step 7 - If the user has scheduled an "Online Sim" and the video has been successfully recorded, they can click the "Audit" button to perform "Self Accuracy Auditing". The user will be redirected to the "Accuracy Audit" page.
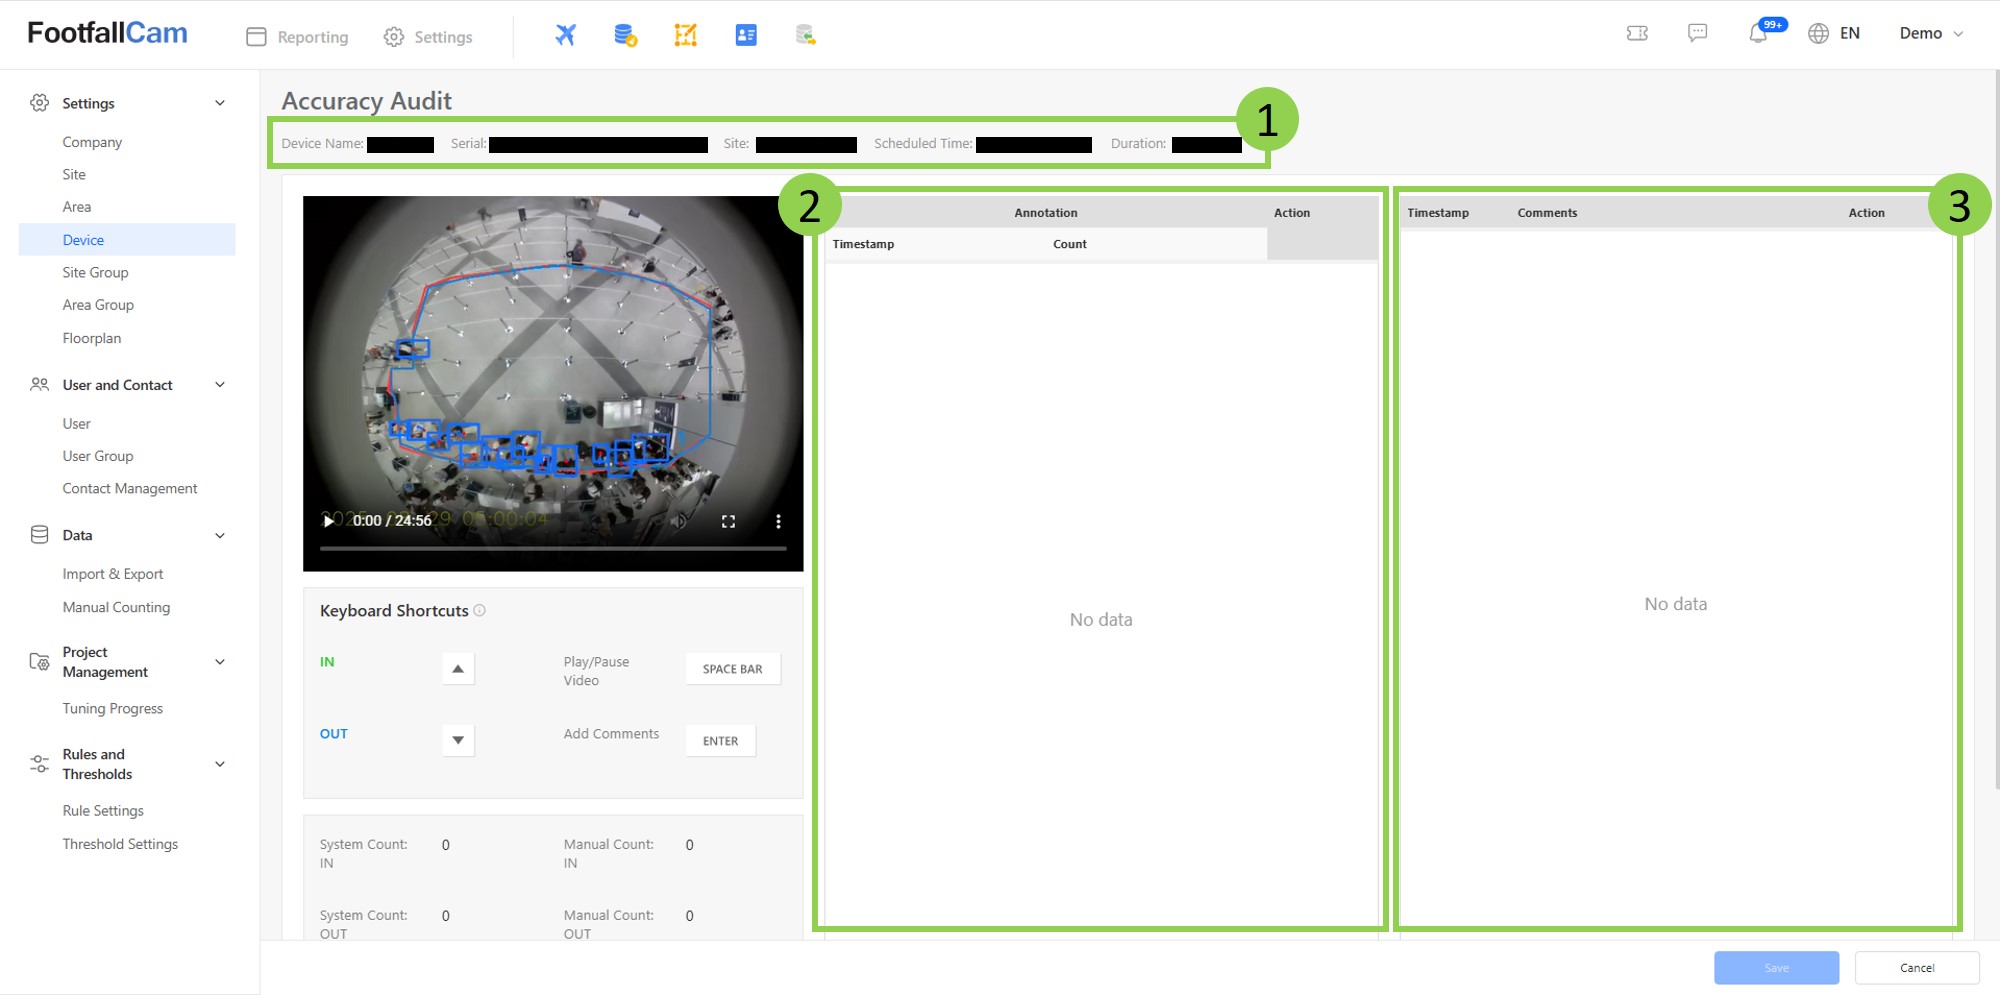
Step 8 - Observe the Accuracy Audit page.
| 1 | Serial, Site: Details of the device. Scheduled Time: The local time at which the video was scheduled. Duration: The original duration of the recording. The produced recording may be shorter than the original duration due to fluctuating framerate throughout the recording. |
| 2 | List of Annotations |
| 3 | List of Comments |
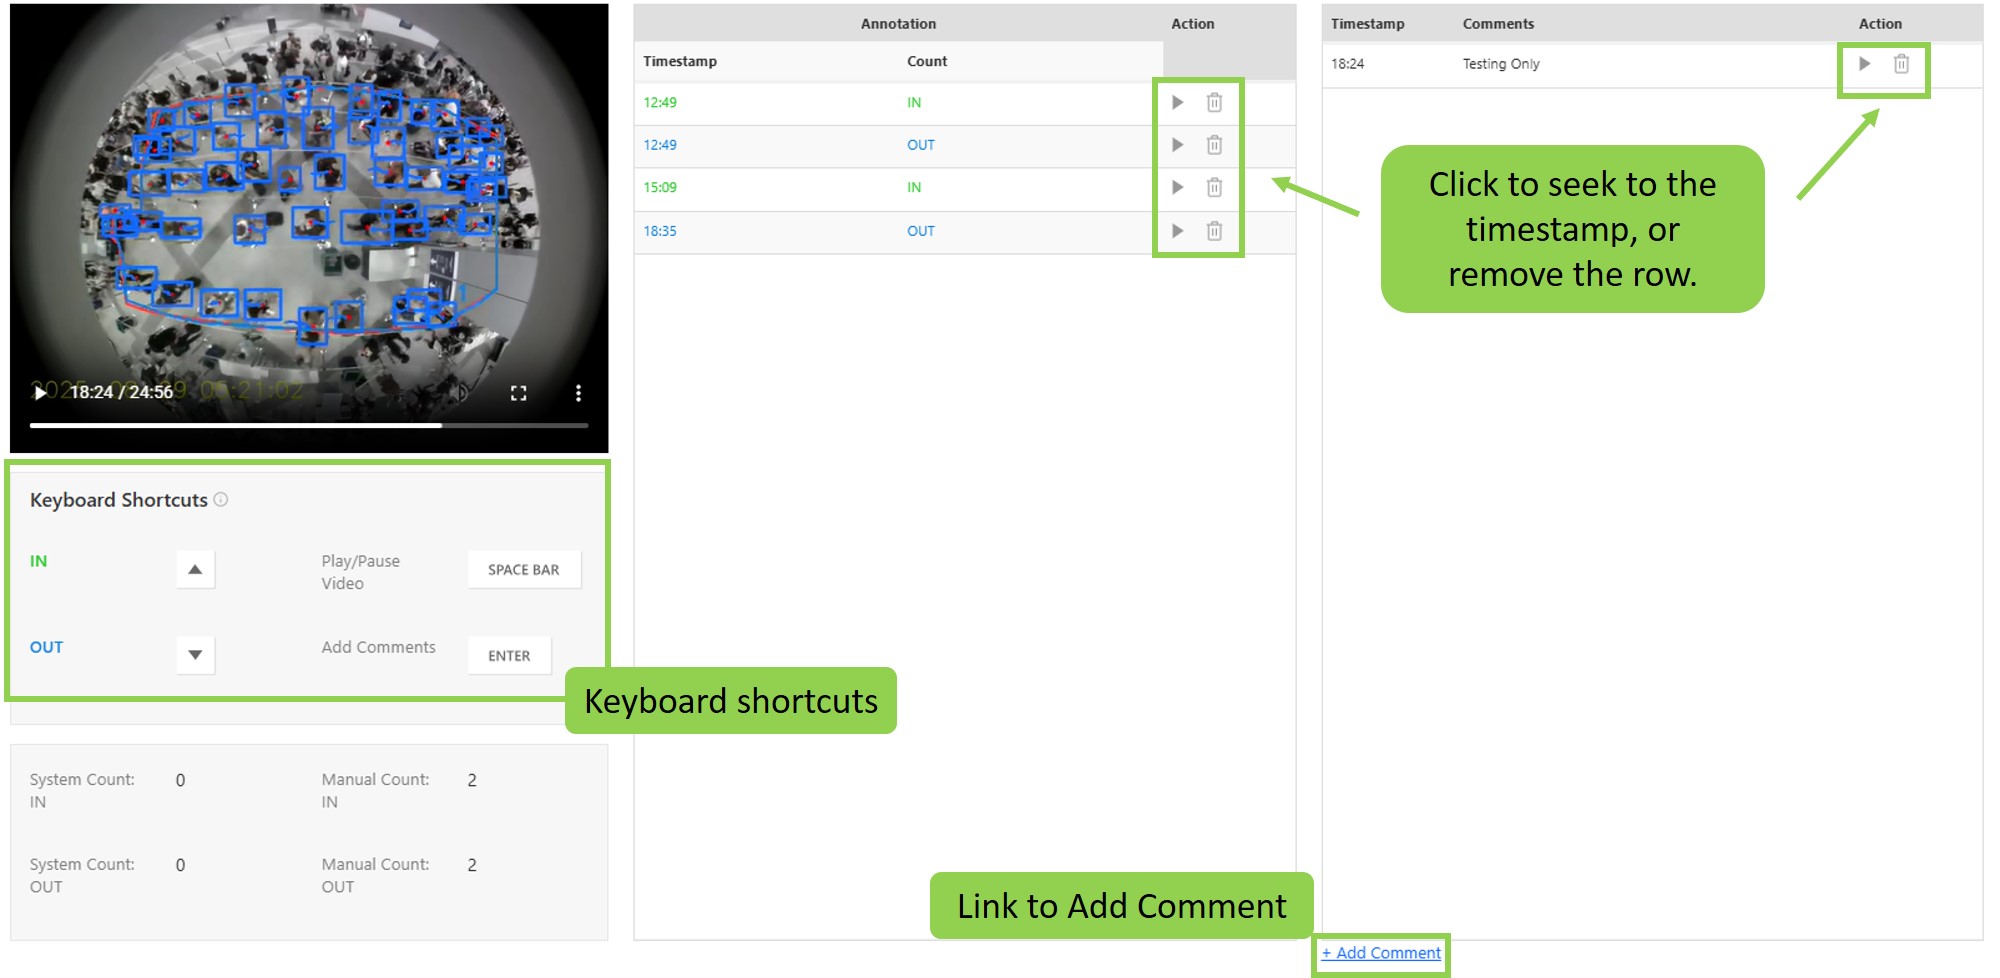
Step 9 - The user can now annotate the video. When the user observes any "IN" or "OUT" footfall, they can use the keyboard shortcuts to annotate.
To add a comment at a given time stamp, the user can use the keyboard shortcut or click the "+ Add Comment" link.
For each annotation/comment, the user can press the Play Button ▶ to seek to that timestamp or the Rubbish Bin 🗑️ to delete that annotation/comment.
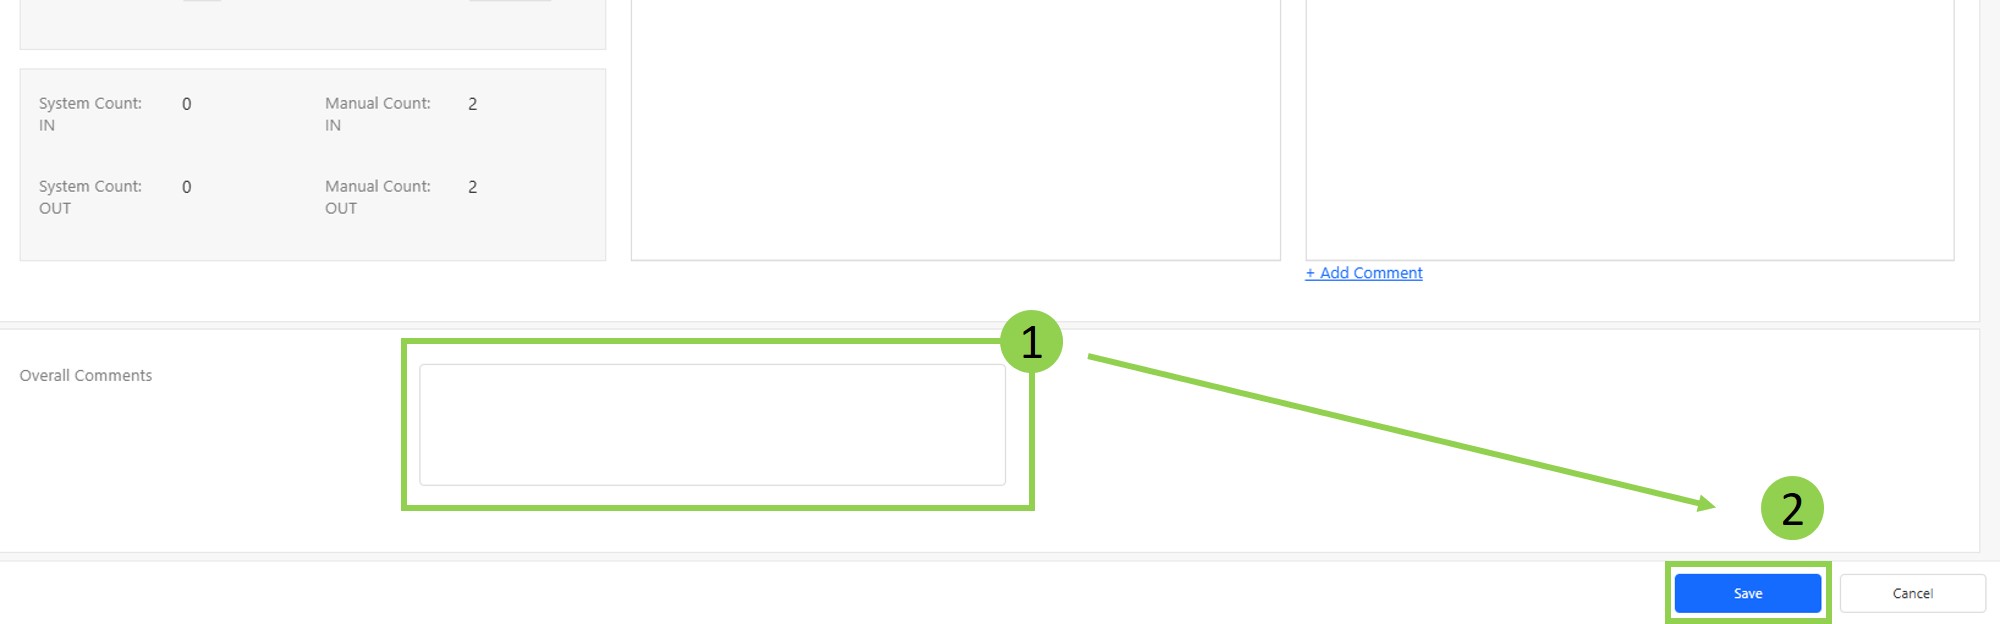
Step 10 - The user must provide an overall comment on the annotation effort. Then, the user can press "Complete" to save the changes.
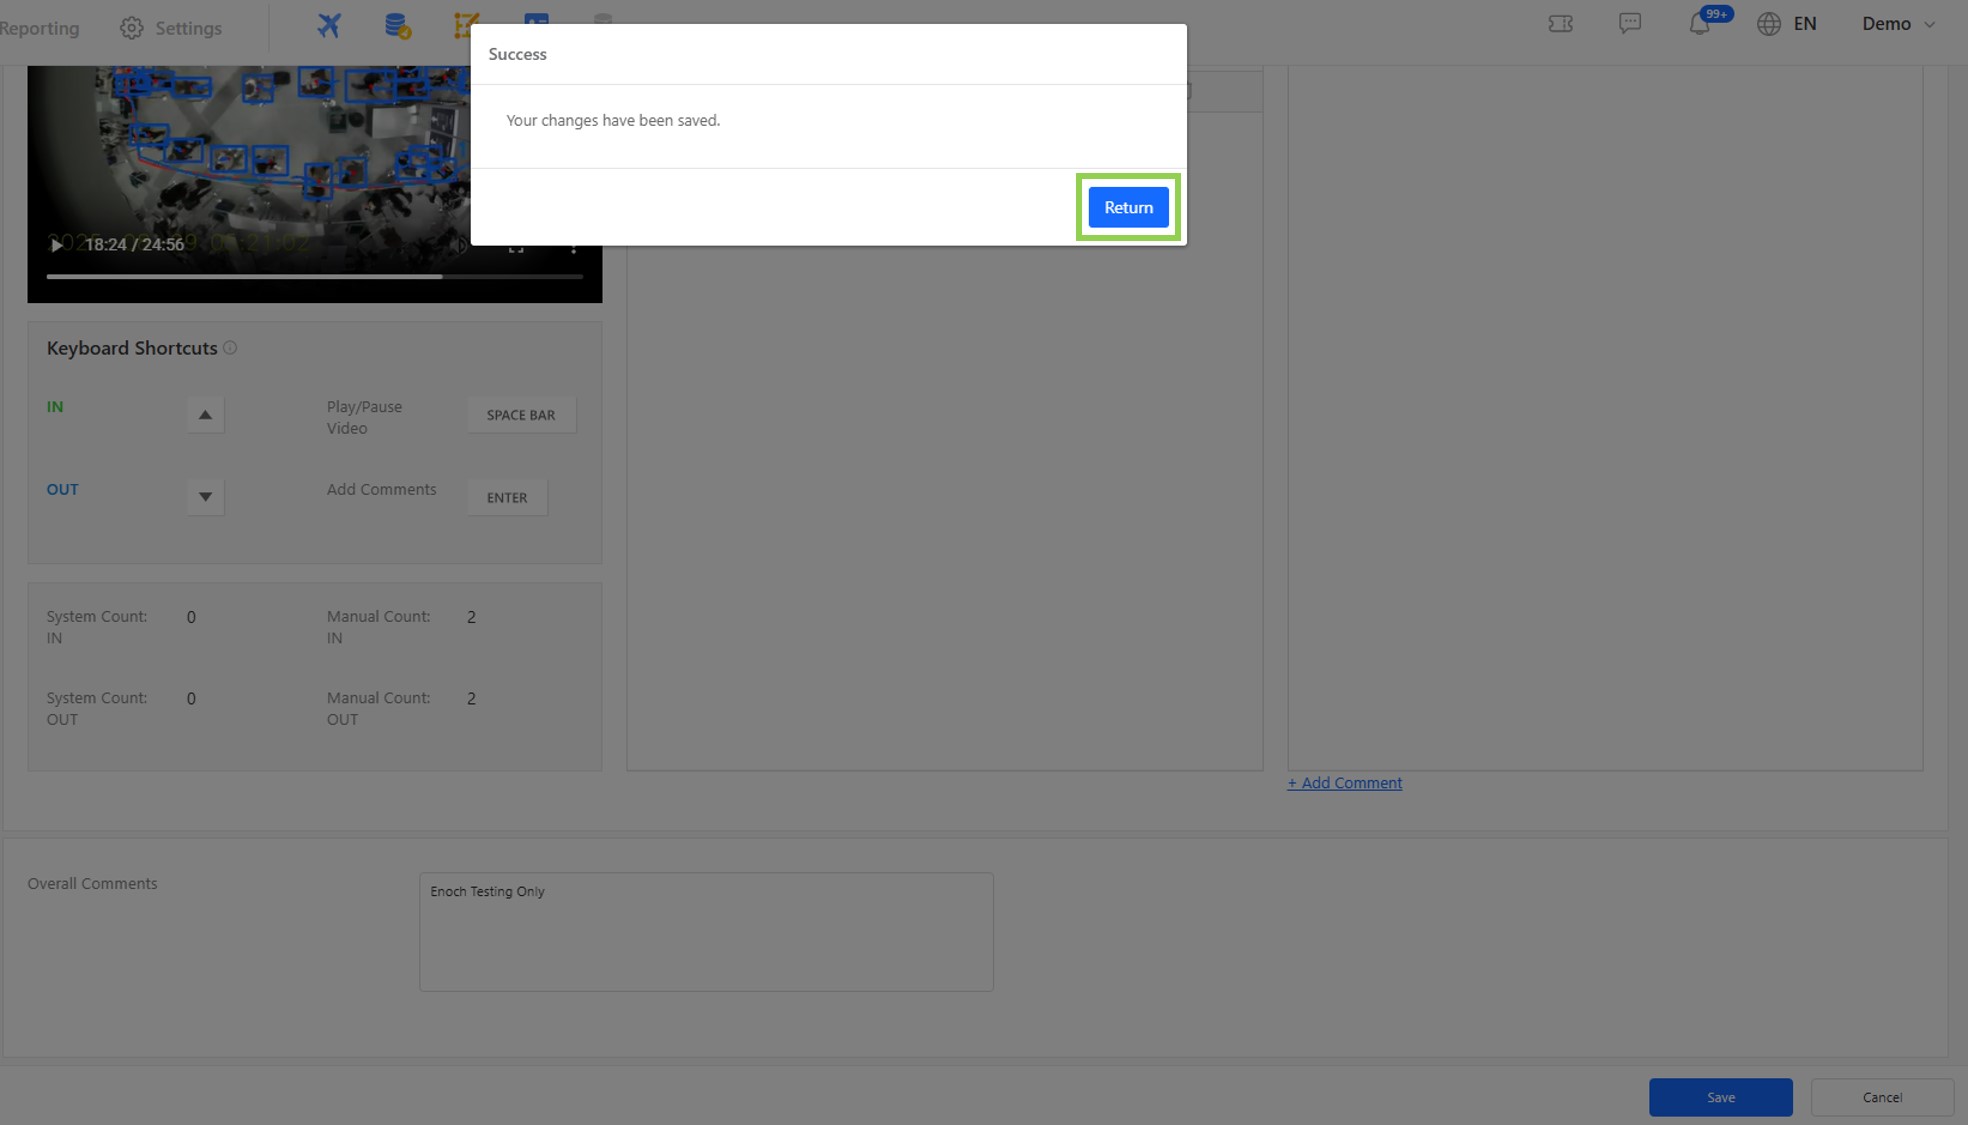
Step 11 - The user will be redirected back to the Accuracy Audit page when their changes have been successfully saved.
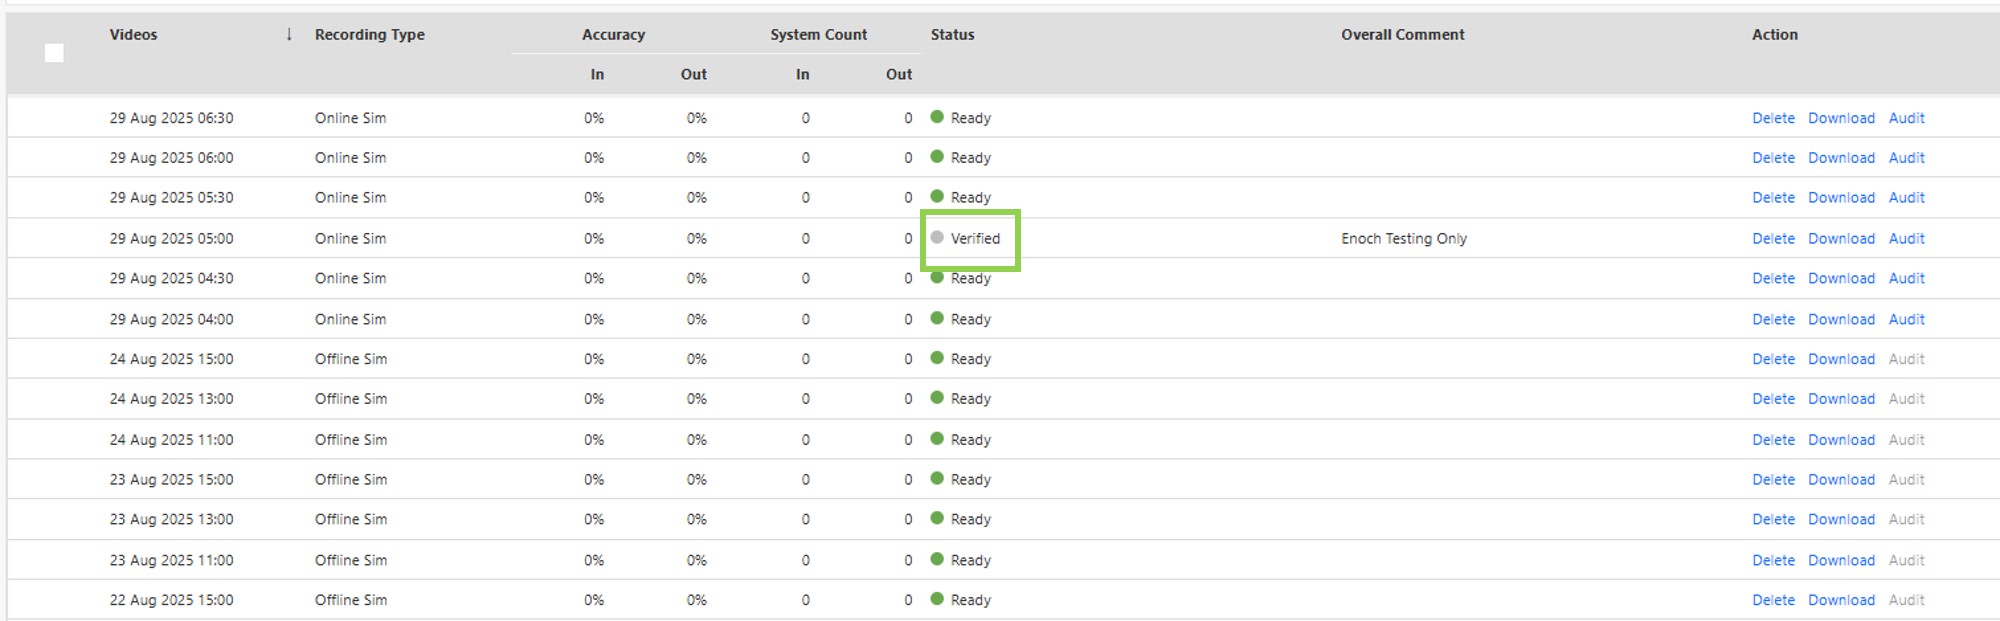
Step 12 - The row that has been audited will now show the "⚪ Verified" status.
3.1.2.3.3 Live View/Video Audit for Accuracy Checking
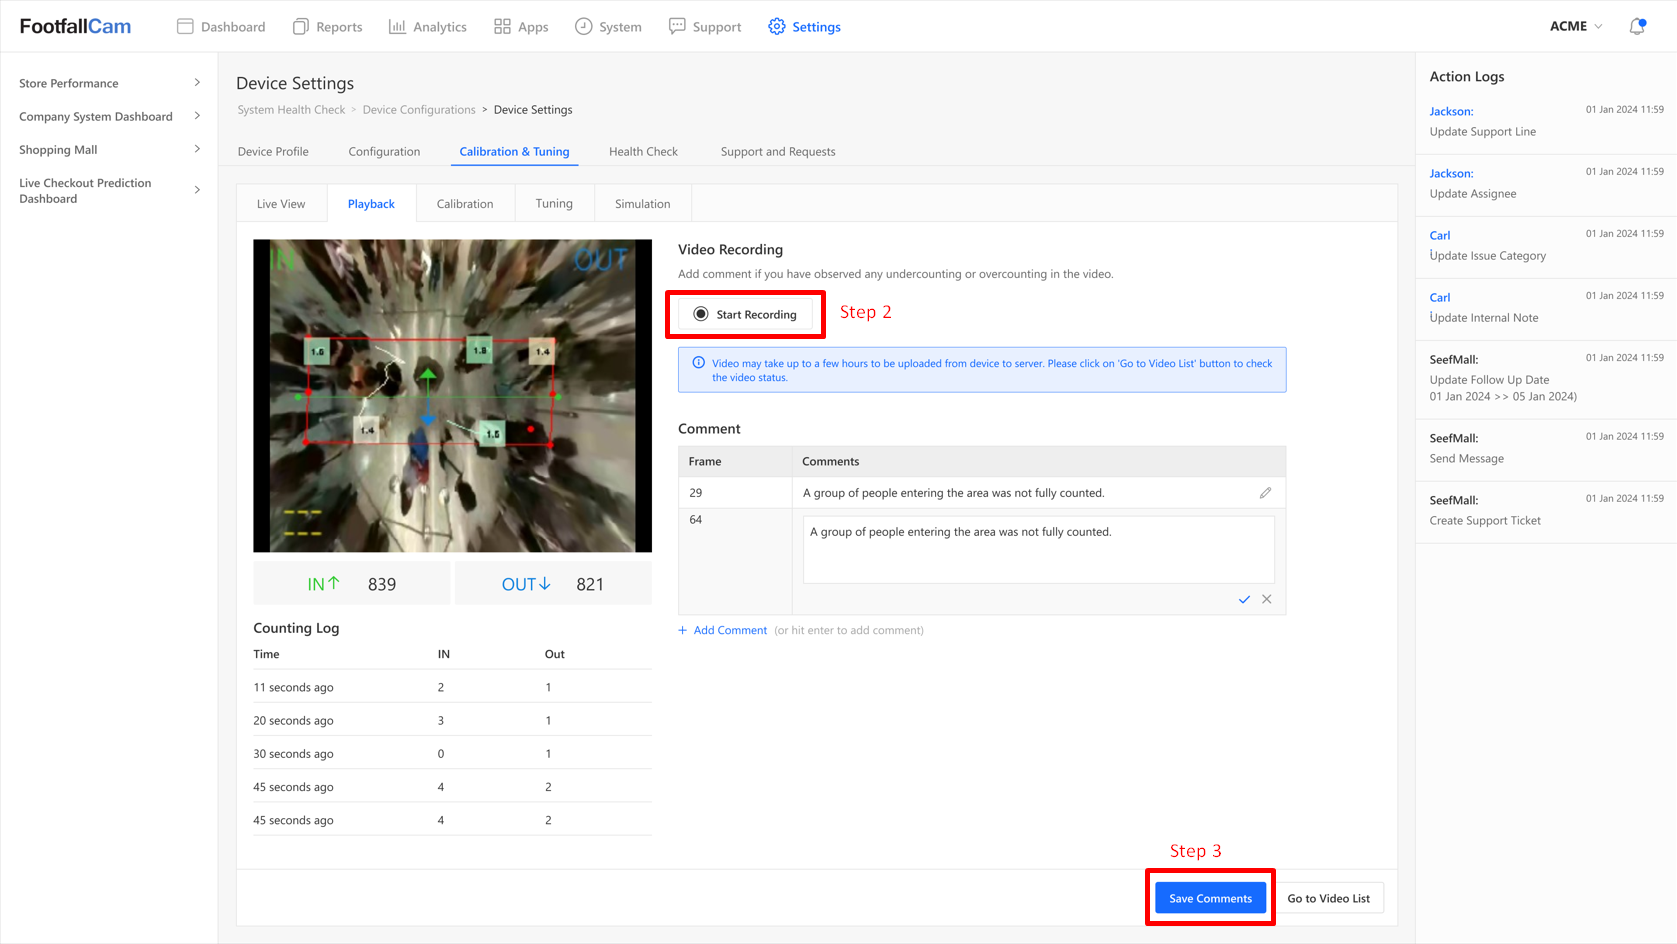
Step 1 - Go to Settings > Device Page and click on Edit in Action column to go to the device settings page
Step 2 - Under Calibration and Tuning tab > Playback tab, click on Record Video Now button
Step 3 - Start Recording and leave comments when there is undercounting/overcounting is observed from the live view
Step 4 - End recording and save comments
(Note: Alternatively, you can also schedule video and perform accuracy audit when the video is available)
3.1.2.4 Data Audit in Data Integrity Workspace
Step 1 - Check the site data readiness,
If 'Site is Operating' and 'Site is Certified', proceed to Step 2
Else, device is not ready for accuracy checking yet
Step 2 - Check if there is any data anomaly symptoms can be observed from the 'Site Hourly Data for the Last 90 Days' and 'Site Hourly Data for the Last 7 Days' graphs
| Data Anomaly | Descriptions |
| Step Change |
A significant drop or increase in the data trend from a specific date onwards. 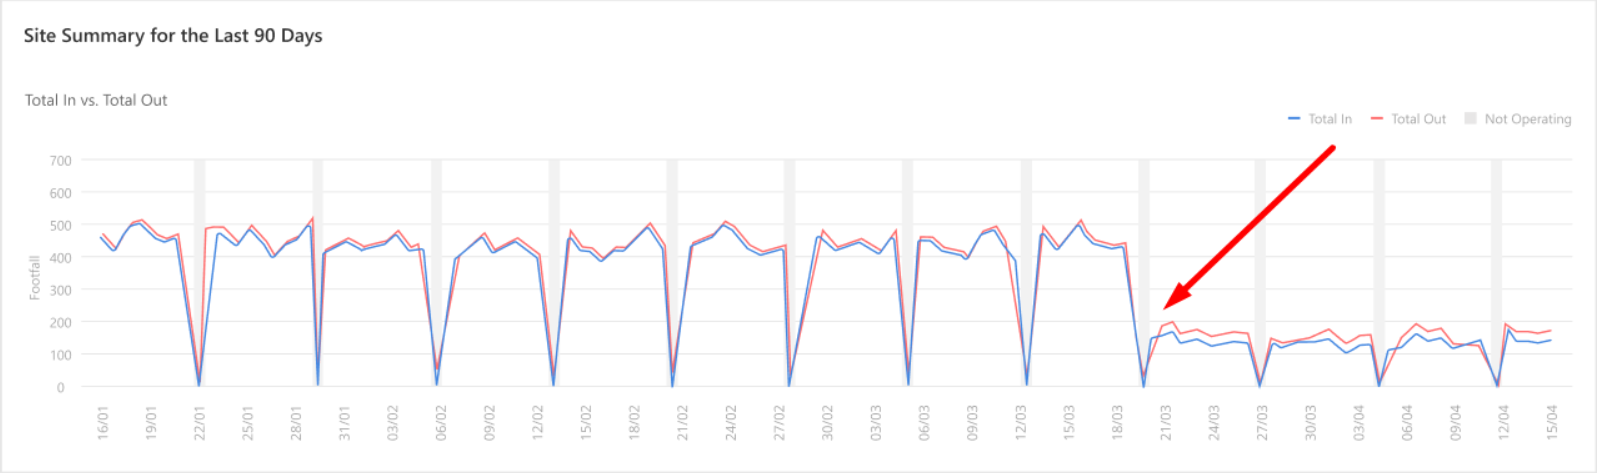 |
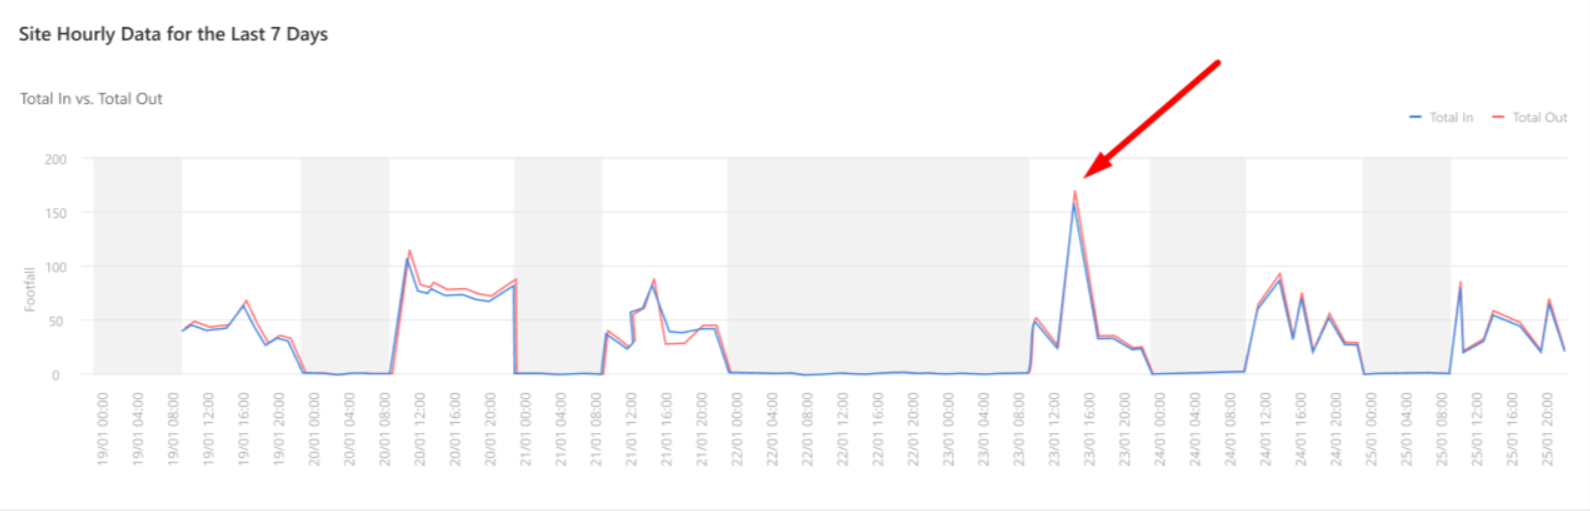
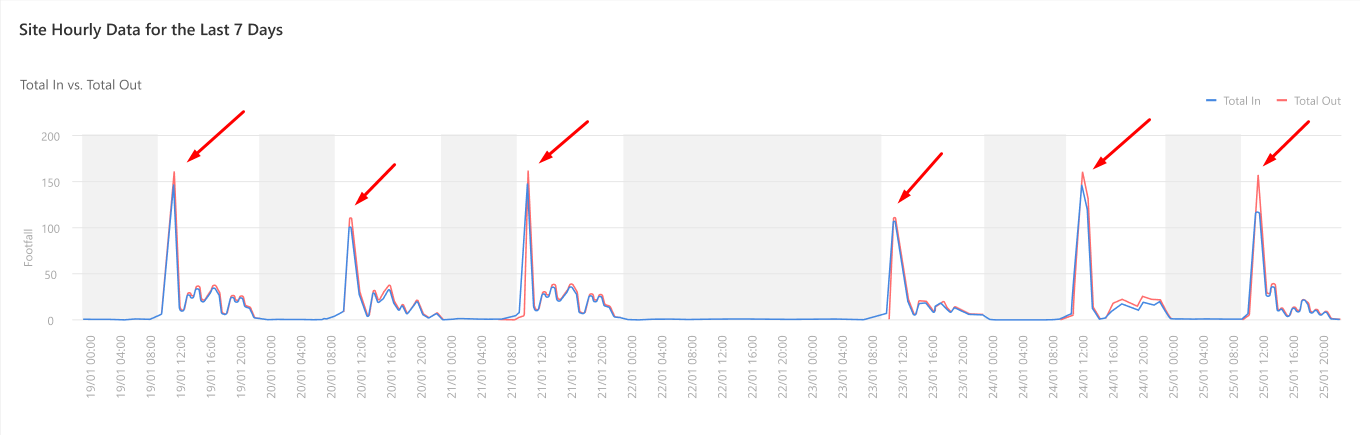
| Data Spike |
1. One-off Data Spike: Unexpectedly high counts occurring at a specific hour or day, happening only once.
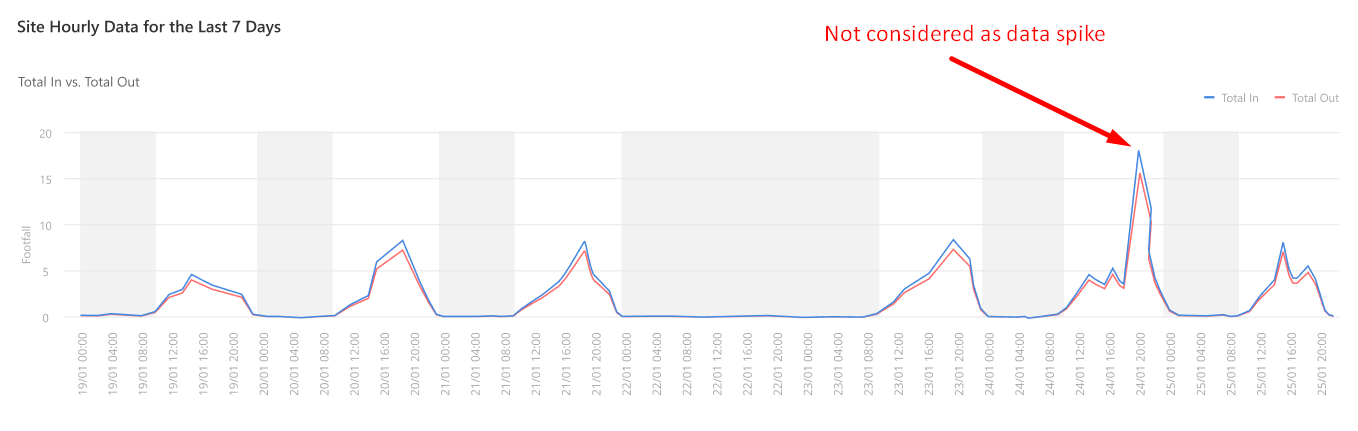
Note: The following example is not considered as data spike as the difference between the highest value and other values is too small.
|
3.2 Data Preparation
Data preparation is a crucial process in transforming the raw data into a format that is suitable for analysis or modelling. In our system, we have ready with some data preparation job for our customer to perform the transformation before analysis.
| Job Type | Applicable Metric | Time Granularity | Entity Level |
| [Old & New Pipeline] Footfall Counting Data and Outside Traffic Data Patching |
|
|
|
| [New Pipeline] WiFi Data Patching |
|
|
|
| [Old & New Pipeline] Footfall Counting Data and Outside Traffic Data Patching |
|
|
|
3.3 Data Import and Export
As a data analytics system, user is able to import data from other source into our portal to obtain secondary metrics, such as import sales data to obtain the sales conversion and able to export our footfall data for other business purposes. Recurring data import export is available in the system, with pre-configuration.
To create import or export job, you may follow the steps below:
Step 1 - Login to Analytics Manager V9 portal via: https://v9.footfallcam.com/
Step 2 - Go to Settings > Data > Import & Export to access the existing import & export job list.
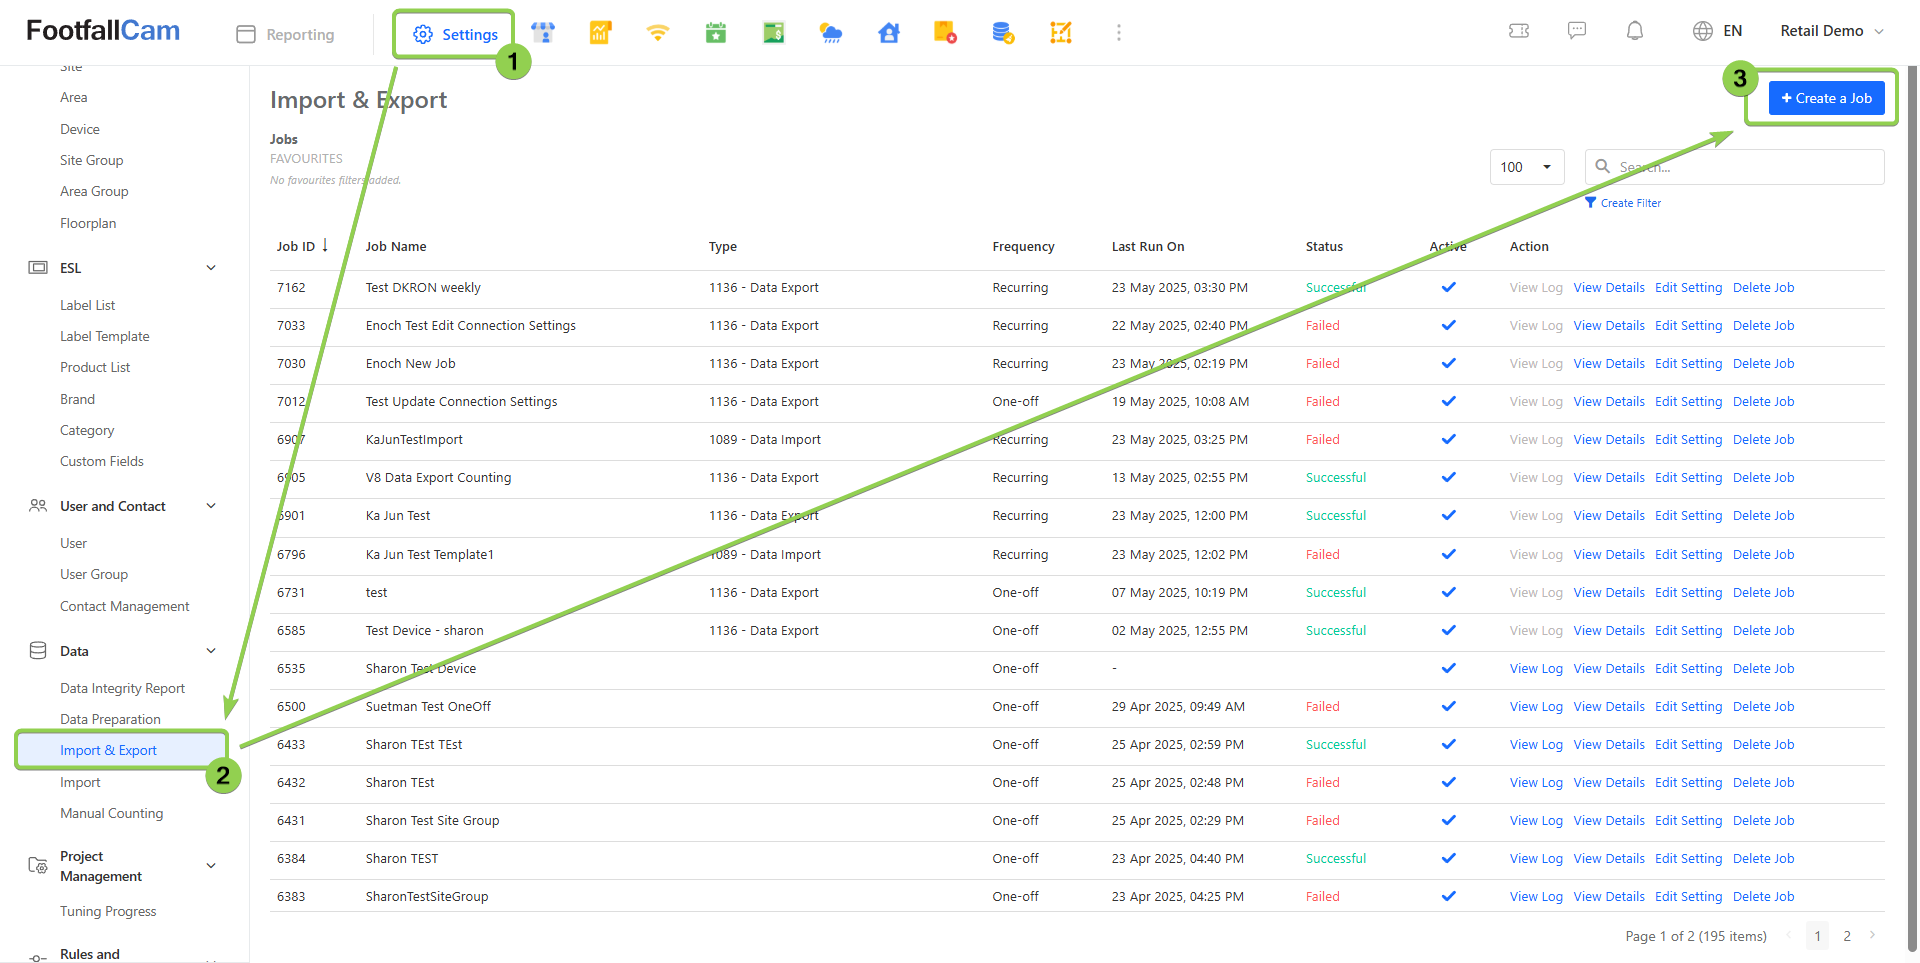
Step 3 - To create new import or export job, click on the + Create a Job button, then fill up the preferred job and select the job type, then click the Create button to proceed.
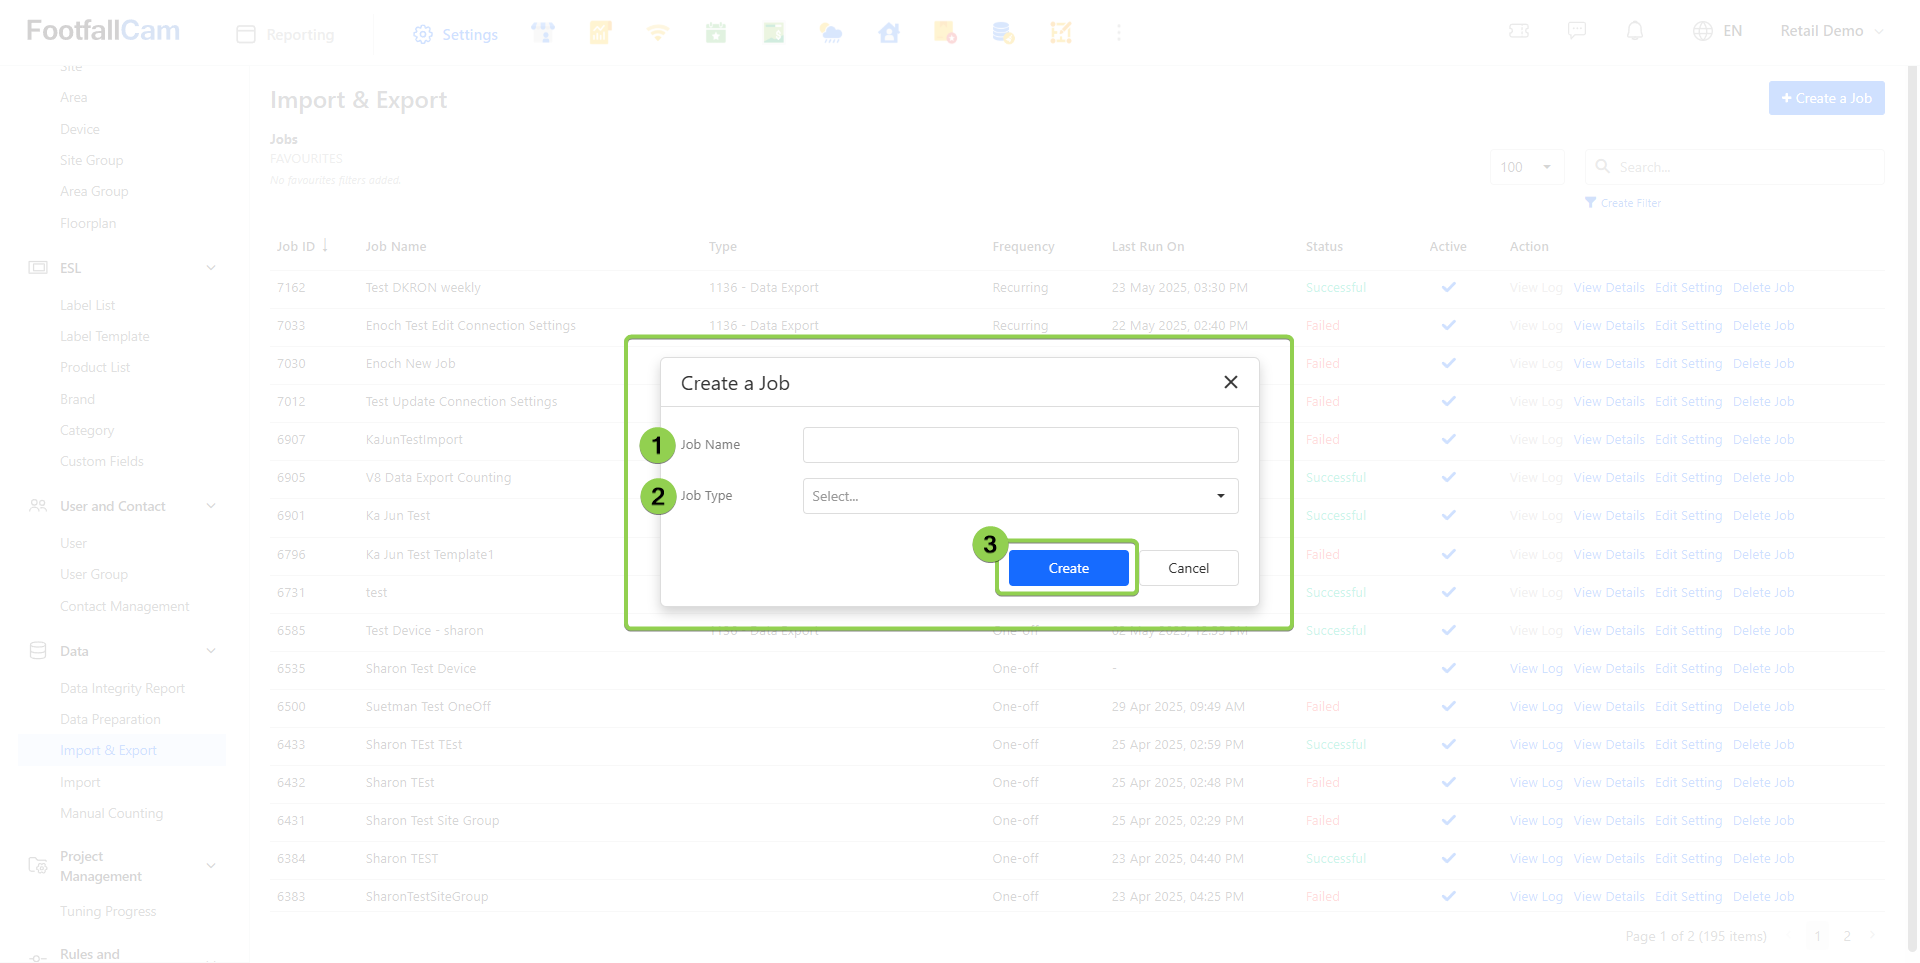
| Item | Description |
| 1. Job Name | Enter your preferred job name. |
| 2. Job Type | Select the job type whether to import or export. |
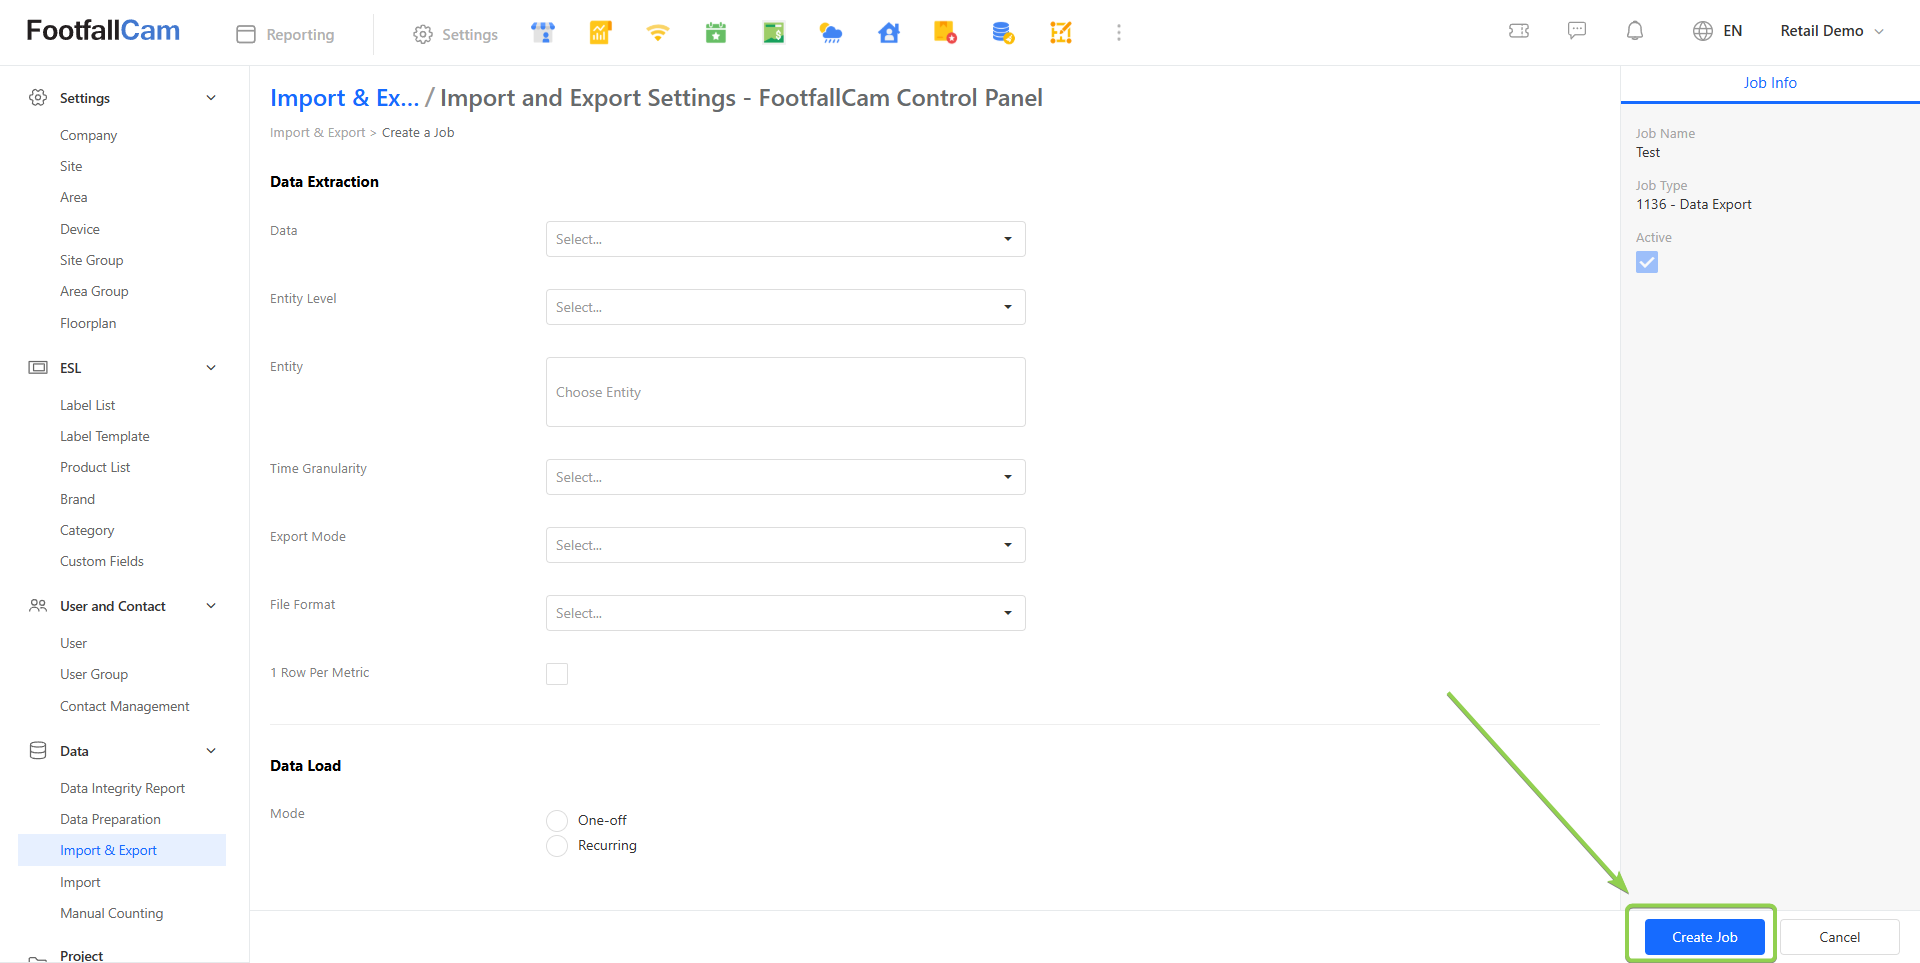
Step 4 - You will be redirected to the detail import export job page according to the job type selected. Fill up all the details and click on the Create Job button to create the job.
Our system provides a lot of methods for data import and export, and the export files including different metrices. For more information, you may refer to the chapter below: